Sunday, January 13, 2013

Wand-Making Made Easy

(c) 2012 by Tom King


Simple Wand with Scroll Markings
 What with the long winter evenings upon us, here's a little project you can start on in your spare time that is inexpensive, fun and will make you the hit of the neighborhood next Halloween.  With the end of the Harry Potter series, the movies move to television and begin their second life. J.K. Rowlings' brillliant series about the lives of children in a school for wizards actually has some very positive things to say to kids.  The series is not about magic being an easy bail-out the way so many kids movies have been.  It is rather about making choices and how if you choose to do right, things usually come out okay in the end.

Simple circular grooves with color variations.
One of the key characters in the series is Mr. Olivander, the Wandmaker.  He's an interesting character and provides most of the Hogwarts School children with their first wands. This past year I tried my hand at wandmaking and made some kids in my neighborhood very happy by sending them home, not with candy (my wife took care of that), but with their very own "first wands" complete with sales tags.

They are easy to make from hardwood dowels.  I use the thicker 5/8 to 3/4 inch dowels so that I have room to carve designs into them and so they aren't an eye-poking-out hazard.  You can find a description of how they are made on this Hubpages article.  The trick to really selling these wand is the individual tags for each wand. 

When I buy the dowels, I alway note the type of wood.  I've found dowels at Home Depot, Lowes and other lumber supply places made of poplar, oak and ash.  They aren't terribly expensive and you can get three or four 8 to 15 inch wands out of them.  You simply cut them into the lengths you want, Carve designs in them with a lathe if you have one or a Dremel-Moto Tool.  You can even make them interesting with a simple whittling knife if you have some skill at whittling.


Custom tags add authenticity

The key is to start early.  Carve the wands, then stain and varnish them.  There's a polyurethane wipe-on varnish that's great for this type of project.  You don't brush or spray it on, but wipe it on with a soft cloth. It's thin, so you'll need to add multiple coats, but it gets down into the carvings and adds nice colors and textures.

When you're done, you'll need to print up some tags for each want and attach them with a loop of string as shown in the article linked above.  The tags, like Mr. Olivander's wands will specify the length, type of wood used, the "core" used and the rigidity of the wand.  A typical tag might read:
Olivander & King
Wandmakers
Poplar - 12 inches
Core: Phoenix Feather
Pliant

By mixing up the tags and giving each it's own unique qualities and designs, you'll be creating a one of a kind keepsake for each child who comes to your door.

The only problem is that if word gets out, you may have to make a lot more wands next year.  The good news is, it's fun and you can find all sorts of wood for them just by keeping your eyes open.  If you have a lathe, it's even easier. Dowels off chairs, broom handles and even scavenged hardwood tree limbs can be pressed into service.  My dog, Daisy, and I found several likely branches on our rambles through the forest and the wands made out of natural tree branches had a mysterious and magical look to them that made them popular with the kids. 

If you take on the project, be sure and send me some pictures.  I'd love to see your work.

Have fun with it.

Tom

Saturday, January 12, 2013

How to Prepare Haystacks – Texas Style


(c) 2013 By Tom King

Photo borrowed from "It's Gotta be Gluten Free" website
First off, we’re not talking about cattle feed here, though if you’ve got a whole lotta people corralled, this traditional Adventist potluck favorite is one of the best ways to feed them all, fill them up and send them on their way in no time.  It’s suitable for feeding visiting choirs, Pathfinder clubs, youth groups of all sizes and any group that shows up needing to be fed on short notice. 

Every city, state, country and continent has its own version of the venerable haystack.  In Hawaii, they put pineapple and macadamia nuts and stuff in it.  Up north I saw a version made with baked beans.  I’m going to describe the way it’s done in parts of Texas.  If you have a local version, you are welcome to post it here for all of us to share.  A Seventh-day Adventist named Ella May Hartlein is credited with coming up with the recipe in the early 1950s, when she and her family craved Tostadas and could not find a Mexican restaurant close to their home according to Wikipedia.  Apparently the Amish and Mennonites have their own versions of the haystack too.  Here's the version I grew up with.

Here’s what you need for Texas-Style Haystacks:
·          


  1. Lots of lettuce (chopped or shredded)
  2. Bags of Tortilla Chips (or Fritos Corn Chips)
  3. Tomatoes - diced
  4. Onions
  5. Mounds of Grated Cheddar Cheese
  6. Sour Cream
  7. Black Olives
  8. Jalepenos
  9. Ranch Dressing
  10. Avocados or Guacamole
  11. Pace™ Picante Sauce (accept no substitutes)
  12. Ranch Style Beans

Here’s How to Set the Serving Line:


  1. Place two long folding tables end to end
  2. Chop up the vegetables, put everything in bowls with the proper sized spoons.  The only thing that needs to be heated is the beans.
  3.  Set out the serving bowls in this order on the table.

a.      First stack the paper plates at the start of the serving line.  Use the heavy Chinette ones because a haystack can get pretty heavy.
b.      Second place a huge bowl of chips right after the plates.  Tortilla chips are traditional in Texas, but I’ve seen it done (more expensively) with Fritos Corn Chips – regular sized.
c.      Third, set a huge pot of Ranch Style™ Beans with a couple of big soup ladles in them.
d.      Fourth, a big bowl of chopped lettuce
e.      Fifth, a big bowl of diced tomatoes
f.       Sixth, smaller bowls of onions, black olives and jalapenos
g.      Seventh, a big bowl of grated cheddar cheese
h.      Eighth, a big bowl of guacamole or chopped avocados
i.       Ninth, bowls of sour cream, bottles of Ranch Dressing, bowls of picante sauce and a bottle of Catalina French Dressing for visiting Yankees and Californians.
j.       Flatware, napkins, drinks

Construction Techniques:

You build your haystack according to your own tastes, but for newbies, here’s the basic order of battle.  You can pretty much follow the order of setup, but everyone has their preferences.  Here are the directions for constructing the basic haystack:


  1. Lay down a bed of chips covering the bottom of your plate. Everything else is built on top of the chips.
  2. Scoop hot beans on top of the chips
  3. Lay down a bed of lettuce on top of the beans
  4. Spoon tomatoes generously over the lettuce
  5. Sprinkle onions, olives and/or jalapenos to taste over the salad ingredients
  6. Cover with grated cheese.
  7.  Add picante sauce to taste
  8. Decorate with spoonfuls of avocado/guacamole, and ranch dressing (or Catalina French if you must). 
  9. Top with a spoonful of sour cream.  Always save one olive to put on top of your little snowcap of sour cream to complete your mountain of deliciousness.

 Warning:

A haystack is not a “Taco Salad”.  It is a breach of etiquette to call it that or to put the chips on top of the beans.  Everything else can be laid down according to your own personal preference.  Take it easy on the jalapenos if you’re not used to them. 

Haystacks are pretty cheap to make and very filling.  Young people love them and because you make them yourself, little kids can even make their own versions which leave out anything “yucky”.  Haystacks are perfect if you need to feed a lot of people fast and you can leave extra unopened bags of chips and beans in the kitchen and add more to the feast if things start running low.  We always keep extra unopened jars of Pace, blocks of cheese, bottles of salad dressing, lettuce and tomatoes to chop up.  If you don’t need them, you can take them home or store the unopened jars for the next time you need to serve this imminently useful dish for your church potluck.


Tuesday, December 18, 2012

The Homemade Refrigerator Magnet – Computer Designed


I spent a year or two as a home tester for Avery Products and discovered that there are some really amazing things out there you can print on.  What really struck me was the printable sheets of magnetic material.  This stuff is great.  I’ve made all kinds of things out of these from simple refrigerator magnets to sheets of magnetic business cards for my special clients – the ones who actually can afford refrigerators to hang my business cards on.  It’s also great for grandparents who can’t hang enough pictures on the fridge.  Magnetic photos pile onto the fridge door like a collage.  The more you pile on, the better they cling to the door.

You don’t need very much to do the project with: 
  1. A computer with graphics capability
  2. A good printer that does photo quality printing
  3. Some desktop publishing software. Even a run-of-the mill word processor that came with your computer can usually manage it.  My ancient copy of Adobe Pagemaker 6.5 handles the task nicely. Microsoft Publisher works well too. There's also a freebie downloadable open source desktop publisher called Scribus that works well too.
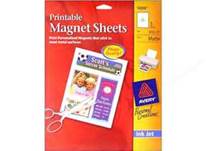
  4. Printable magnetic sheets like the ones pictured
  5. The photo or graphics files you are going to use.
Here’s how I made this funny refrigerator stick-on with the sad-eyed dog.
  • Design your project. You can do it in your head or sketch it out on paper first.  I usually design my projects on the computer as I go.  This one wasn’t complex.  If you don’t have the picture you want to use in digital format, you’ll need to scan it or copy it with a digital camera that has a close-up lens.  
  • Start your computer and crank up your desktop publishing software.  For this project I created an 8 ½  by 11 inch document.  I dropped this picture into it to make a background for the magnet, sizing it to 4 by 6 inches.
  • Add any text or other graphics.  You can see where I added the text over the top.  To get it to stand out you can do a simple drop shadow the old-fashioned way.  Do the text first in a solid font in black.  Then copy the text box, paste it onto the page, change the text to solid white and then placed it slightly above and left of the black text so that the lower black text is almost covered, but not quite. With Pagemaker, however, you can just do the text once and add soft shadows with font effects – much simpler.
  • You can even make permanent refrigerator art. If you have a scanner, you can scan your kids' and grandkids' artwork and turn it into a refrigerator magnet of whatever size you want and print them on the magnetic sheets. 
  • Save the document so you don't lose it.  Save frequently, every time you add something new and it's right. That way if your file goes funky (as they all do sometimes), you can shut the file down and reopen it from where it was last doing what you wanted. If you rely totally on the auto-save feature, sometimes it saves your screw-ups and you can't go back to where it worked for you. Regular saves will prevent that from happening. 
  • Make your document 8 ½ by 11.  The magnetic sheets come in that size and have a white printable surface. To save on the material, I lay my designs onto an 8 ½ by 11 page in Pagemaker.  That way I can move them around to print the image where I want it to.  In this case I was using a new sheet, so I placed the picture and text in the top left corner, allowing half inch margins on top and to the left since my HP 6122 doesn’t print all the way to the edges.  If you’re at all ambitious, now’s a good time to make a whole bunch of stick on pictures and designs of varying sizes and paste them onto the desktop publishing page till you fill the page.  You can also do multiple copies of your design on a single page.  Many word processors will duplicate a single photo and space it over a full page like a business card.  You can always print the one design, then use the remaining material by turning it around and running it through with the uncut end first.
  • Print using the photo quality settings.  The flexible magnetic material goes into your printer with the white face turned to the side it’s going to be printed on.  With my printer it’s white side face down.  Don’t handle the sheet when it comes out or you’ll smear the ink.  It takes about 15 to 20 minutes to dry after printing.
  • Next, cut out the design.  You can use a sharp pair of heavy duty scissors or an Exacto knife.  I have a wheeled paper cutter that works great for this kind of thing.  At a craft store you can buy cutters that cut shapes like stars and flowers if you want to do that sort of thing.  Just size your pictures appropriately when you lay them out.  Word processors and desktop publishers have rulers you can show next to your work to get your pictures and graphics the right size. 
Once your magnet is cut out, just slap it on the refrigerator door and there it is – your dog, your kid, you fishing boat or whatever else you want memorialized there.


How cool is that?

Tom


© 2012 by Tom King