Showing posts with label canoe. Show all posts

Tuesday, March 01, 2016

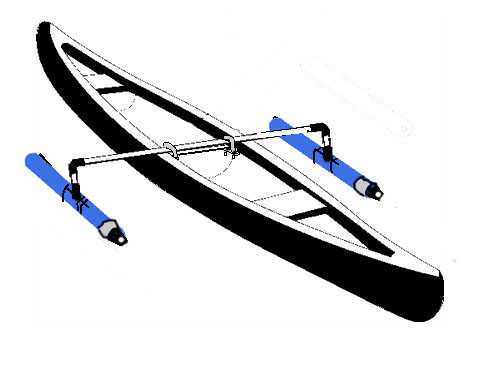
Boats & Floaty Things: The Homemade Canoe Stabilizer.


It's coming on springtime and time to get out on the water in the old canoe; perhaps to do a little fishing.  A canoe, by it's very nature is an unstable platform for fishing. In fact, any activity that involves a lot of moving around heavy equipment, standing or climbing into and out of the boat in deep water. Canoes are not good platforms for scuba diving and they definitely are not the best watercraft to stand up in and wrestle with an active trout, pike or other large fish, unless, of course you like being pitched headlong into cold water while weighted down with fishing gear. My whole life, I would hear news reports almost every other weekend of the fishing season of sheriff's department divers searching the lakes, rivers and bayous for some fisherman's water-logged corpse after he'd fallen overboard from some unstable boat. 

If all you have is a canoe, however, there's good news.  An easy solution to the instability of a cone was invented centuries ago by the Polynesians. The Pacific Islanders for millennia only had coconut palms and other skinny trees from which to hollow out boats for themselves. Skinny trees do not make for stable watercraft and the sea is a wild and wavy place. So these clever folk created outriggers for their sea borne canoes to increase their stability. There are a lot of commercial outrigger setups that are available for canoes, but they can be relatively expensive, especially if you're only using the canoe for fishing rarely. Here's an effective solution. It's not terribly stylish, but it will keep you from drowning yourself while fishing by making your boat less tipsy.

The trouble is that canoe-based fishermen may forget, in their excitement to get out there and hook themselves a lunker, that the water is still cold. Fall in and hypothermia may get you before you can get to shore, particularly if you're wearing a heavy jacket, boots or are loaded down with one of those vest with all the pockets and you have a lot of led sinkers stuffed in a few compartments.

Here's what you need to make this.

Tools:

  • Zip ties
  • PVC cleaner
  • PVC cement
  • Knife
  • Hacksaw

Materials:

  • Styrofoam swimming “noodle” with hole in the center
  • 12 feet of 1 inch heavy duty (stiff) PVC pipe
  • Two 1 inch PVC “T’s”
  • Two 90 degree 1 inch PVC elbows
  • Two large u-bolts. They should be wide enough to fit over the center thwart of your canoe and long enough to clamp the thwart and 1 inch pipe together
How to put it together:

  • Measure and cut the pipe - Measure the width of your canoe at the center thwart (the one you will
    Crossmember with elbows cemented in place
    clamp this rig to.  Add enough length to it so the pipe extends 12 to 18 inches beyond the gunwales of your canoe.  If, for instance, your canoe is 22 inches wide, add ag least 24 to 36 inches to the width of the canoe and cut the pipe that long. The reason for giving you a range is so you can adjust it to your own preferences. A shorter outrigger pole is less stable, but more stiff, so it flexes less when you are standing in the boat. The longer length will make your outrigger more tip resistant, but less strong and more prone to flexing. If you want a longer outrigger that is more stiff, simply buy a heavier gauge pipe. You cold even use a light metal pipe of the sort used in electrical conduit, but it will significantly increase your cost and may not help that much.
  • Once you've cut the pipe, cement the two 90-degree elbows to ends of pipe so that both openings.
    Crossmember with down pipes and T's in place
    When attached both elbows will need to turn downward.  The cementing part is easy. Clean the ends of the pipe and the insides of the elbows with PVC cleaner. Spread the pipe glue on the outside of the pipe and inside of the elbow and push them together.  The cement will set pretty quickly.
  • Cut two 4" to 6" pieces of 1 inch pipe and glue them to the open ends of the elbows so you have both pointing the same direction (downward when the rig is in place).

  • Now glue the two PVC “T’s” to the end of the down pipes so that their openings are perpendicular to the cross pipe.  The openings should be parallel to the sides of the canoe.
  • With a knife, cut two 24 to 27 inch long pieces from the Styrofoam swim noodle.
  •  Slit the noodles lengthwise so the cut goes halfway through to the hollow center of each noodle.
  • Now you'll need to cut four pieces of pipe so that they are 12 to 14 inches long. Measure and cut
    Noodles wrapped over perpendicular pipes
    the pipes so that with one stuck into each of the openings of the PVC T's will equal the same length as the piece of swim noodle that will be your outrigger's flotation.  
  • Cement one pipe into each end of the two T's.  Let the pieces set for ten minutes before moving the framework around.
  • Now pry apart the lengthwise slits in the Styrofoam noodles wrap them around the pipe assemblies attached to the "T's".  The pipe should settle down into the hole at the center of the noodle. You'll have to push the “T” down into the slit and there will be a gap there. You can trim around it with your knife for a close fit or just pull it tight with the zip ties. Your choice. When you are done you'll have two stiffened foam floats running parallel to the sides of your boat once the cross-member is clamped into place

  • Wrap zip ties around the noodles spaced evenly along either side of the “T’ joint to hold them in
    Zip tie close to T's then space along length of noodles
    place.

  • An easy way to streamline your outriggers and cut drag is to cut the bottom out of 12 ounce water or soda bottles.  With a screwing motion you can force them over the ends of the foam noodles. Once they are in place, wrap a few turns of duct tape around them to hold them in place. If you want something more permanent, you could drill through the bottles, the foam and the pipes underneath and run a small bolt through it all and add flat washers to both ends and lock washers to the nut side to hold it in place. I wouldn't go that far, though. I always keep some duct tape with the boat for repairs. If the tape gets soggy, just replace it. 
  • With your U-bolts clamp the cross member to the center thwart. I'd pad the thwart between the
    Bolt crossmember in place, Cover ends of noodles
    with soda bottles for streamlining effect
    bolt and the thwart to prevent scratching but that's up to you. An easier way is to zip tie the outrigger/stabilizer cross member to the center thwart with heavy duty zip ties and you’re ready to go. 
You may have to fiddle with duct tape or something to keep the cross member for rotating or sliding right or left. You could custom design some sort of over and under shaped wood mounting saddle for the cross member with bolts and wing nuts to hold it in place.


References for commercial resources:


Outrigger Stabilizers for Canoes and Boats: Castlecraft

Canoe Stabilizer: Sailboats to Go

Outriggers for Canoes: Easy Rider Kayaks

Dan’s Kayak

Canoe outriggers to stabilize your canoe: RM Specialites
http://www.canoeoutriggers.com/

© 2016 by Tom King

Sunday, June 13, 2010

Adding An Extra Seat to Your Canoe

Here's a simple way to add a third seat to your canoe.  Why you'd ever want one is something of a mystery to me, though if you only paddle quiet lakes with an extra kid in the boat, this might be useful.  The problem with a third seat is that it puts the weight of the extra person a bit higher in the canoe than if that person were sitting on the bottom.  The higher the weight, the more tipsy the canoe, but if you've got a bit boat, this extra seat should give your middle passenger a high enough position that he or she can paddle comfortably rather than sitting in the bottom like a big sack of rocks.

Take out the center thwart so you'll have room for the seat and your legs.  You'll want the weight of the third seat passenger balanced at the center of the canoe.


Drill holes for the screws that are large enough for the 4 inch long sheet metal screws you are going to use. Make sure they are the same distance apart (7 inches for an 18 by 10 inch seat. These holes will allow you to screw into the center of the hardwood dowels.
You can use 2x2s if you stick with hardwood for strength.  Use a 1 to 1-1/2 inch hardwood dowel otherwise. Use screws with washers to fasten the dowels. in place.  The washer distributes the binding force across more hull area and reduce wear and potential damage to the hull.


Dab a little epoxy or butyl sealant on the ends of the dowels and position them so the holes are at the center of the dowels. When you cut the length of the dowels, make them as exact as you can.  You don't want them to push the sides out or pull the sides in and distort the shape of the canoe.  Predrill holes into the ends of the dowels once they are in place.

Dab a little butyl rubber sealant over the holes and then drive the screws into the ends of the dowels to hold them in place.  If your canoe is aluminum or wood, you should have plenty of side strength to handle the weight on the seat. If you've got a plastic, fiberglass or composite boat, you may need a brace.  more on that later.
The half inch marine plywood seat should be at least 18 inches wide for comfort if you have that much width to work with. If you don't you should really rethink adding another seat cause buddy, if your boat is that narrow, you are going over if you add more weight that high in the boat.  Use a router to round the top edges to avoid splintering and chafing you skin when you sit on it.


Turn the seat over and screw 1 by 1 strips to the front and back edges of the seat (the long sides).  Glue them down first, then predrill and add 1 1/4 inch screws along the length of the strips.


Once you get all the screws into the 1x1 strips, use the router to round the edges so they won't chafe your legs while paddling in the kneeling position (which you should if you've got a third paddler.  It keeps the weight of your legs lower so the boat is more stable.


Set the canoe seat over the top of the dowels.  The two 1x1 strips should fit snugly outside the dowel to prevent fore and aft movement of the seat.  This view shows the dowels without the canoe.  Of course, when you do this part, you've already got the dowels in place across the gunwales.


Once the seat is in place, Drill holes through the seat down into the dowels.  Don't put more than about 5 holes into the dowel to avoid splitting or weakening them.  Screw 3/4 to 1 inch screws into the dowel to secure the seat in place.  Use butyl sealant in the holes before you drive the screws in to seal them against water. Then stain and apply 3 to 6 coats of marine spar varnish to protect the wood from getting wet.  If you want to be especially thorough, varnish the dowels and seat separately before attaching them.  You'll have better water protection that way and the seat will last for years and years.


If you're afraid your boat won't be able to handle the weight on its sides, especially for light plastic, fiberglass or composite boats, add a center support by simply cutting a 2 by 6 and setting it lengthwise under the center of the seat.  Screw the top end in place through the seat.  Attach the lower end with epoxy or, if the canoe hull will accept fiberglassing, just fiberglass the entire support and base to hold it in place. If the canoe is fiberglass, you can always fiberglass the entire seat assembly and glass around where it attaches to the hull to strengthen the seat.

This, will of course, increase the weight of the canoe, but if you've got one big enough for a third seat, it may not matter much.


A third seat may be just what you need for paddling around the old pond. I wouldn't want to use one in whitewater, but not everyone does rough water anyway.  A canoe rental on a quiet lake could probably add seats like this for the comfort of those threesomes that want to take out a boat and not have someone get his or her butt wet by sitting on the floor of the boat.

Also, this seat design works if you want to replace an uncomfortable seat or add a seat to a thwarts only canoe like the one I learned to paddle in at summer camp.  

Have fun and remember.  It's your boat. Do what you want to it just so you don't sink her.

Tom King - Tyler, TX

Tuesday, April 06, 2010

Fixing a Busted Old Stripper

Restoring a Damaged Cedar Strip Canoe

You’ve got damage to that beautiful cedar strip canoe of yours.  Now what do you do?  The repair job is relatively straightforward if you have a modicum of woodworking skills, but you may want to go a little farther.  You may want to consider fiberglassing the whole thing when you are done to add years to the life of your boat.  A light fiberglass cloth with an epoxy-based resin adds a beautiful thick clear coat that not only protects the hull, but also brings out the wood grain in stunning fashion.

This How-to is in two parts then.  First – replacing the cedar strips.  Second – fiberglassing the hull.  Of course, part two is optional, but it’s worth considering if you’ll be using the canoe a lot or if it’s stored outdoors.

Replacing the Cedar Strips

Step 1
Decide how badly the hull is damaged.  If it’s just a dent, you can probably sand it down or fill in the spot with a thin cedar veneer.  For this tutorial, we’ll assume a hole that damages two adjacent strips (it’s never one is it?).  You’ll have to remove them.

Step 2
When you remove the damaged strips, you’ll want to stagger the cuts as shown in the picture.  This disguises the repair and increases hull strength by avoiding the placement of end seams next to each other. 

Step 3
Once you’ve marked where you want to remove the strips, you’ll need to cut the end seams first. I use a sharp knife and score crosswise across the old strip where I want to cut it free.  Then rescore repeatedly till you are through the wood strip.  Because there are ribs and other layers of hull underneath, you can’t just take a saber saw to it as you would with one of the cedar/epoxy canoes. Now score a couple of passes along the sides between the piece to be removed and the neighboring strips. To remove the strips, score down the center and split each strip.  You can then carefully pry them up in the middle and pull the edges loose for the neighboring strip.  The strips should come apart at the side seams and lift right out.  Do everything slowly and carefully so as not to damage neighboring wood.


Step 4
Very lightly sand the edges to remove splinters.  Too much sanding can curve the straight edges along the sides and end, so go easy.  Lay a piece of butcher paper over the hole and use a pencil to shade the outline of the place to be repaired.  This will help you when cutting the replacement strips.  Be sure to measure the thickness of the strips on your canoe so you get replacements of the correct thickness.  You don’t want a dip or bump where the new repair is.

Step 5
When you cut out cedar strips for the repair, use the pattern you made to reproduce the exact shape of the hole.  Work slowly because you need the strips to fit exactly into the opening.  Use epoxy glue or other high strength water repellant glue.  Apply it to the edges, ends and back of the strip as you fit it into place.  Don’t use glue where the second replacement piece will touch the first.  Keep this area clean and dry till you are ready to install the second piece.  Press the strip into place and wipe any excess glue that squeezes out around the seams.  Apply pressure while the glue sets to hold it tight against the hull.  Depending on the spot you may be able to set something heavy on it or bungee something block like over the top. Use something that won’t adhere to the glue in case some more squeezes out of the seams.  Let the first strip dry and cure overnight.

Step 6
Take pictures to show you doing this all by yourself.  Video is nice if you can get it.  You want evidence so that when you're beating your chest over the beautiful work you did and someone calls you on it, you can whip out a photo.


Step 7
Apply the second strip the same way you did the first and again apply pressure while it is setting.  Again, allow to dry and cure overnight.

Step 8
Get some wood filler that matches the color of your cedar strips. Use 1/32 milled glass putty filler if you can find it.  Work the filler into the seams where there are any gaps or holes.  Let it dry, then sand the entire repaired area and adjacent strips.  Gradually lighten your sanding pressure as you move onto the neighboring strips.

Step 9
Now you need to make a decision.  Are you going to just varnish the repaired spot or fiberglass the hull to prevent any further damage?  If not glassing the hull, then once you’ve fine sanded the repaired area, apply several thin coats of marine spar varnish to the area.  You may find that you need to recoat the entire hull in order to blend in the patch.

Glassing the Hull

Step 1
For this you’ll need the following:
Epoxy fiberglass resin and hardener
Disposable small bucket or can and stirring stick for the resin
Flat edged spreader (plastic or metal wide putty knife will work).
4-6 oz. E-glass Fiberglass fabric - Plain Weave Thickness: 0.0093"
Fine grades of sandpaper and a few course sheets for the edges.
Steel wool fine to extra fine
Acetone
Latex or rubber gloves
Respirator, especially if working indoors.

Step 2
Use a 4 to 6 ounce E-glass fiberglass fabric that is lightweight and works well with the epoxy resin. You’ll need a piece large enough to completely cover the boat.  It should overlap by a couple of inches, as the cloth will shrink up when curing.  Use heavy-duty scissors to trim the fabric along the gunwales all the way to the ends of the canoe.  You may need to cut notches out of the fabric to accommodate curves in the hull, bow and stern.  If you do, tease a few threads from the fabric along where the edges of the cuts will meet so they blend together better when you apply the resin and you don’t get that overlap “bump” when you are done.  I use duct tape to tape the fabric in place while trimming and remove it as I apply the resin.

Step 3
Put on your gloves and respirator.  Mix up a small batch of epoxy resin. Starting at one end, pre-wet a section of the hull with the epoxy resin.  Pull up the fiberglass cloth.  Pre-wet the area by brushing it with the epoxy coat.  Now lay the fiberglass back over the wet resin and push it into place with your fingers.  Brush more resin on top to saturate the fiberglass fabric till the white threads and any bubbles disappear.  E-cloth is harder to saturate than regular fiberglass cloth, so be patient.

Step 4
Use the spreader to smooth the surface of the section, to press the cloth firmly against the hull, to make sure the resin fills all the spaces in the fabric and to remove any remaining air bubbles. A low viscosity resin helps the E-cloth soak up the resin better.  You can also warm the resin before lay-up. This helps make the repair completely transparent.

Step 5
Proceed section by section from one end to the other. When you’re done, go back to the parts that have already set and tap the surface with a quarter. If it sounds hollow, the fiberglass has delaminated from the hull and will need to be removed and replace.  If you’re careful, however, this should not be a problem.

Step 6
Allow the fiberglass resin to cure overnight.  Then crank up the sander and smooth the edges where the fiberglass may have overlapped the edges or created bumps or burrs.  Sand the entire hull thoroughly first with light sandpaper and then two or three more times with progressively lighter sandpaper.  Finish by rubbing the whole thing with fine grade steel wool.

Step 7
Brush or spray on an epoxy based clear coat.  A sprayer works better, but either way use thin coats and apply several allowing them to dry and cure between coats.  Lightly scrub each coat with fine steel wool and wipe clean before spraying the next coat.

Step 8
Get out the buffer and polish the hull to a high shine.  Your beautiful shiny canoe will slip so quietly through the water you won’t believe it.  It will be a little heavier to carry, but let’s face it.  You aren’t likely to be taking this beauty into any whitewater rock gardens are you?  You’ll just want to stand there in the garage and look at it, but don’t be afraid.  Take it out on the water and make everyone jealous.  Cedar canoes are the Rolls Royces of the canoe world.  Show your baby off!

(c) 2010 by Tom King:  Rights Reserved.  Feel free, however, to link to this website.

Monday, April 05, 2010

Canoe on a Shelf

How to Build a Shelf-Style Canoe Rack

Introduction

An easy way to store your canoe is to build a canoe shelf on an empty wall either inside or outside the garage, tool shed or other handy structure. It takes just a few simple tools, some shelf brackets, padding and a pair of two by fours. A canoe shelf keeps your boat up off the ground and allows you to store the boat without a lot of bending of your back and knees.

Materials:

2 large metal shelf brackets at least 18 inches wide
2 pressure-treated two by fours, 4 feet long
A bag of 2 inch galvanized screws
2 pieces of thick pile carpet 8 inches wide by 28 inches
Drill and bits
Saw
Stud-finder
Stapler and 1-1/2 inch staples

Step 1
Find a wall with cleared space long enough for your canoe.  If you have an 18-foot canoe, you’ll need a wall with at least 22 linear feet of open space. Remember you need room for the folks carrying the canoe to get around the ends to hoist it up onto the rack.

Step 2. 
Find two wall studs to screw into. They should be about a third of the length of the canoe from either end. If you have an 18-foot long canoe, position the shelf brackets about 4 to 6 feet from the ends (no less than 4 feet).  If the shelf is on an outside wall this keeps the sun from heating a composite or plastic boat and making it sag in the middle.

Step 3
Screw the shelf brackets to the wall so the top of the bracket is 3 ½ inches below where you want the gunwales of the canoe to rest.  Back the screw heads with washers. Use 3 ½ inch galvanized screws and predrill the holes.  You can make the rack high so the boat will be up out of your way – if it’s, say, inside a garage or shed.  Just remember, you’ll have to lift the boat up onto the shelf.  Don’t make it so high so that racking the boat is difficult. You can make the shelf waist height and avoid lifting altogether. This is great for an outside rack and saves on the old bones if you’re not 22 anymore.

Step 4
 Measure the beam of the canoe amidships.  This is the width from gunwale to gunwale at the center.  Add two or three inches to this measure and cut your two by fours this length.


Step 5
Set the two by four’s on edge on top of the shelf brackets.  Predrill the holes from underneath and up through the shelf brackets.  Use 2 inch galvanized screws backed with washers and screw the boards into place.


Step 6
Cut out the carpet pieces so they are 8 inches wide and about two inches shorter than the two by fours are long. Lay the carpet strips over the top of the two by fours and staple them into place.

Step 7
Screw large eyelet screws (1 inch or more wide across the eye) into the ends of the two by fours.  Screw a second pair of eyes in the face of the two by fours on the sides of the boards facing the bow and stern of the canoe (away from the center of the rack).  Place those two up close to the wall.  This gives you a pair of handy hook up points to which you can attach bungee cords or tie-down straps.  You’ll thank me later. 

Tips:

  • Don’t paint pressure treated lumber.  Leave it the natural color. 
  • If you can get plastic astro-turf style carpet, use that.  Regular carpet will eventually rot. Artificial grass will last longer, tolerates being wet and protects just as well.
  • Keep metal brackets and screw heads painted to reduce rusting and this setup will last nearly forever.
  • You can bungee lifejackets and paddles up underneath the canoe for easy storage and transport, so that everything is together.


Warning:
  • If you forget to tie your boat down, a good windstorm can leave your boat in the branches of a nearby tree or you can push it off onto the garage floor when you’re dragging tools around the garage. A friend of mine dented his aluminum canoe while trying to pull an electric cord loose.
  • Make sure you have plenty of room for loading and unloading your canoe safely from the rack. Keep obstructions out from under foot.  Dropping a boat on your toe can be painful.
Rogelio Hernandez of Kennesaw, Georgia sent me the picture below of the canoe shelf that he built.  He could only find an 18 inch wide shelf bracket, but the weight limit was more than adequate, so he re-engineered the design a bit.  He screwed the 2x4s to the top of the shelf bracket, making them long enough to support the width of his very nice-looking Mad River canoe and then added a 2x4 brace out to the end of the support arms. The shelf brackets each have a 600 pound weight limit which would support the canoe fine even with the leverage on it from the extended support arms, but like me Rogelio is more comfortable over-engineering stuff.  Frankly, if I had a nice Mad River like his, I'd do the same.  It's a neat way to support the overhanging arms and, as a bonus, you can screw hooks to the wooden supports for hanging lifejackets and other canoe equipment.

Note how the shelf allows room for the cars to park up close to the back garage wall AND places the canoe at a perfect height for lifting.  No bending over to hoist the canoe up off the floor. Allows you to keep your back straight while loading and unloading the boat.  Also, there are no dark places underneath the boat where rats, cats and the odd chihuahua can hide or collect things.  Crisp, clean and neat. Good job Rogelio and thanks for sending the picture.

© 2013 by Rogelio Hernandes, Kennesaw, Georgia
used by permission


Friday, April 02, 2010

Fix a Ding in Your Canoe

How to Get a Dent Out of a Super-linear Polyethylene Canoe

Sounds kinda heroic don't it? 

Canoes with  lightweight hull designs made of a flexible super-linear polyethylene material sometimes get dents in them.  Fortunately, the material they are made of remembers its shape.  You can use this to help you repair minor dents and dings and even some major crinkles.  Mad River Canoes (tm) uses SLP construction to integrate the hull and deck structure of their Mad River Adventure canoes to provide rigidity, durability, excellent abrasion and impact resistance. Integrated polyethylene hulls balance a modest price against a very tough and virtually maintenance free design. But dents do happen. Here's how to save your boat from early retirement if you hit a rock or leave something heavy sitting on the hull in the sun! The instructions here are for dents, not holes, cuts or cracks that breach the hull. That's a different article.


Things You'll Need
  • Heavy leather gloves
  • Hair dryer or heat paint stripper
  • Patience and sunshine

First
First try putting the canoe in the sun and applying gentle pressure to the inside of the hull once the sun heats it up. The SLP hull of the Adventure series canoe has some "memory" and if gently heated may let you pop the dent out and restore your canoe to its original shape.

Second
Set the canoe up on a flat spot in the sand or soft lawn. For more stubborn dents, this technique works best on a very hot summer day. Fill the canoe with water. Water is very heavy and provides the "gentle pressure" you need to push the dent out. As the sun heats the water, it also heats the hull. When heated the hull may "remember" it's original shape and pop back into shape. You may also have to press the warm hull with your hand to get the dent to pop out. Be careful putting your hand in. Sunlight heated water can get surprisingly hot. Keep an eye on the temperature to avoid distorting the shape of your canoe.

Third
If pushing by hand doesn't work, install a brace inside the hull that presses outward against the dent. You can cut a piece of wood to size or slightly longer and wedge or duct tape it in place against the dent. You might want to place a wide square wooden foot on the undamaged side under your brace so it doesn't create a new dent where the brace presses against the side opposite the dent. Leave the brace in place for a week or so and let the sun heat up the water every day. Don't cut the brace so long it pushes the hull out of shape. Watch out for distortion of the hull. Make sure every part of the hull touches the ground firmly.

Fourth
If the dent resists repair by the above described methods, you can dry out the hull and string a heavy-duty extension cord out to the canoe and plug in an ordinary hair dryer to heat the hull at the site of the dent. You have to keep the dryer moving and don't touch the heating element to the canoe. Heat the dent on the side where the dent is and gently press from the opposite side with your hand. You might want a heavy leather glove for this part since the hull will be quite hot.

Fifth
If the hair dryer doesn't work well, you can use a hot air gun of the sort that's used to remove paint and wallpaper from walls. This requires even more care than with the hair dryer. If you heat too aggressively, you might melt the hull and cause a hole to form. Keep the gun moving quickly at all times in a circular motion at least 1 inch from the hull. Watch closely for glistening and melting of the hull surface.

Preventing Dents

On the Rack
Do not suspend your canoe by it's ends. If it gets hot, it could sag and warp the canoe in the middle. Support racks should support the canoe at either end about a third of the length from bow and stern.


In the River
When in moving water, try not to hit rocks. Scout your path and avoid large rocks or shallow bottoms. You may have to get out and walk your canoe around such spots in the river. Be careful not to drop your boat while launching or unloading. Get lots of help when loading or launching.

In the Drink

If the canoe turns over in fast water and fills with water, do not get in front of it. Guide it quickly to shallow water, turn it over to drain the water and pull it out.. Full of water a canoe is as heavy as the car I used to drive in college and if it hits a rock with that mass and momentum, there WILL be a dent!

In the Sun
Do not leave the canoe tightly tied down, especially in the sun. This could pull a dent into the hull from the pressure of the tie down straps. Especially, be careful of heavy duty crank down straps as they can exert serious force on the hull and cause a warm hull to buckle.

* Don't overheat the hull. You can melt a hole in the hull if you're not careful.
* Repair the dent as soon as possible to prevent it from becoming permanent.
* Don't overload the canoe either in the water or on the rack.
* Don't forget your life jacket and an extra paddle.


(c) 2010 by Tom King

Tuesday, November 24, 2009

Flat Canoe Rack

Easy Canoe Rack for Lakeside

This easy to build canoe and kayak rack is simple to build and use, though it does take up a little more space than some of the other designs I've posted here.  It's pretty easy to build:

1.  Dig 4 post holes.  Each pair to which you will bolt a cross member should be as wide apart as you want the rack to be (3 feet times the number of canoes you have).  Put the pairs about 9 or 10 feet apart. That's half to two-thirds the length of most canoes and kayaks and supports well enough so that summer heat doesn't cause the boats to sag and distort the hulls.  Use treated posts. They should stick up about 2 to 3 feet depending on your comfort level and be treated.  Pour concrete around them to set the posts.

2. Lag bolt a 2x12 pressure treated cross member to the posts as shown in the picture.  Pad the cross member to protect the boat.  I like to buy used fire hose from local volunteer fire departments and screw it on top of the cross members n accordion pleats. The pleats keep the canoes from sliding around on the rack.

3. The canoes sit upside down on the cross members. You can mix canoes and kayaks. If you get more canoes than you planned you can nest them and get more canoes on the rack.

4. To make tie-down easier, screw some eyelets to the face of the cross members to create attachment points for bungee cords.  Tying down the canoes prevents them from taking flight in a wind storm.

Wednesday, September 02, 2009

Lakeside Kayak/Canoe Rack

If you’re like most canoeing enthusiasts, your starting to collect a pile of them in the yard.  If you live by the lake, you’ve probably got your canoes and those of several friends.  Instead of leaving them piled up against the garage where snakes can nest in them, check out this easy to build canoe rack.  This requires a few basic tools and some concrete, lumber, bolts and screws and a couple of hours.


Materials List:

Two 9 foot telephone poles or 4x4 posts
Six 6 foot pressure treated 2x6’s (2x4’s will work)
Six 6 inch long ½ inch carriage bolts with washers
Eighteen small 2 inch lag screws
Nine screw in eye bolts
Four bags of pre-mix concrete
Twelve 18 inch long metal straps with holes in the ends.

Setting the posts:


Find a nice spot with plenty of room around it.  You’ll need lots of space to maneuver canoes onto the rack without stumbling over things or bumping into garage walls.  Dig two 3 foot deep post holes eight feet apart.  Set your posts in them so they stick up about 6 feet above the ground.  Mix up your concrete in a wheelbarrow and pour it into each of the holes around the base of the posts. 

While the concrete is still wet, prop the posts up so they are vertical.  You can do that by propping them up with boards and temporarily nailing them in place.  Don’t drive the nails all the way in, because you’re going to want to pull them out when the concrete sets.

Once the posts are set, mark them at 2 foot intervals from the ground to the top of the post.  This will mark the top of the crossmembers you’re going to bolt into place.  The lowest member will be two foot from the ground.  The highest will be even with the top of the post.

Drill holes in the center of each six foot 2x6.  I used 8 foot 2x4’s for mine, but I’ve never really needed the extra width.  If I had it to do again, I’d use 6 foot 2x6’s for the firmer support.  Mine rocks a bit when loading and unloading. 

Clamp the cross member in place, drill a hole to match into the post.  Unclamp the cross member and finish drilling the hole through the post.  Reclamp the cross member and bolt it to the post.  Once you’ve got all the cross members in place, set them horizontal with a T-square and then add a couple of long galvanized screws to hold them firmly in place.

This still won’t be enough to keep the crossmembers from wobbling when you plop a heavy canoe on them.  On the side of the post where the cross member is bolted, lag screw the ends of two of the metal straps  into the post about 14 or 15 inches below the top of the cross member.  Next bolt the other ends of the metal straps to the back of the cross member on both sides to form a “V”.  This will give you good support without taking up so much space it scrapes against the hulls of your boats.

Now screw eye bolts into the ends of each cross member on the horizontal face.  Don’t stick them up or out from the ends as they will catch on the gunwhales of your canoe.  I know from bitter personal experience.  Put one eye bolt at the center of the crossmember or into the vertical post itself if you don’t want to drill any more holes in the cross members.  These eye bolts provide handy tie-down points.

When you put the canoes on the rack, always, at the very least, drop a bungee cord over the top to hold them down.  You’d be surprised what sort of lift a stiff breeze gives to a canoe hull.  You don’t want to wake up the morning after a thunderstorm and find canoes on the garage roof.  The eye bolts make it easy to keep your boats tied down.

This design is compact and versatile.  I’ve got kayaks, canoes, sail boards and the mast for my catamaran stored on mine.  It took me about 2 hours total to put it all together not counting the time it took the concrete to set. 

(c) 2009 by Tom King - All rights reserved
All images copyright 2009 by Tom King


Tuesday, September 01, 2009

Building a Home Made Canoe Trailer

Got a youth group you'd like to take down river? Dreaming of float parties on the Mighty Mississippi (or the Not-So-Mighty Brushy Creek)? Maybe you'd just like to paddle the little darlin's out into the swamp and lose 'em. All you need to get them there is a bunch of canoes. The best way to carry a bunch of canoes is on a canoe trailer. Canoe trailers can be kind of expensive, but if you've got an old boat trailer (and who in the South doesn't), then a solid knowledge of welding, some steel, plywood and some imagination can help you build a very nice, easy-to-use trailer upon which to carry your canoe and kayak collection to the river.

First thing you need to do is wash down the old trailer, check the brakes, running lights and generally make sure it meets legal requirements. To register it, you may have to get what's called a builder's title. The county tax assessor's office will be glad to help you with that and charge you a nice registration fee to boot.


Check the tires for wear and proper inflation. Old boat trailers are easy to find around lakeside communities. You can sometimes get them for a song. If you're doing this for your youth group, ask them to donate it. Never hurts to ask. Look for one with as wide a wheelbase as possible. Just make sure the trailer is roadworthy before you start welding things together. Strip off any unnecessary parts like hull rollers and winches that will get in the way of construction.

Next you're going to build two canoe supports with cross trees upon which to strap down your boats. You'll need two measurements.

First, measure the depth of your canoe from gunwhale to keel. Allow 3-4 inches more for maneuver room for each canoe. If you're doing a 6 boat trailer, then it will be 3 boats high. Figure the depth of two boats plus 6-8 inches, plus however far the upright will stick down to where it will be welded to the frame.

Next, measure all your boats to determine how wide and how long they are. Compare the measurements to the trailer to determine how wide to make your crosstrees. Be sure, if you've got 3 foot wide canoes that not only do you make the cross trees 6 feet wide, but add another 6 inches for the upright support and a couple of tie down eyebolts on the end of the cross tree.

Once you know how long your uprights and cross trees are, you can buy the steel - 2/4's for uprights and 2x2's for cross trees. Have them cut to the length you want. You'll need 2 uprights and the same number of cross trees as you have boats. A six canoe trailer will need 6 cross trees.

Next, measure the distance between the front and rear vertical 2 x 4 tube steel supports. mark a piece of 2 x 2 tube steel to form the lengthwise cross-member (or members if you elect to add a second lower one as shown).

Cut the steel once it is all marked. If you don't have the equipment, you can get everything cut at a local welding shop. Tell the steel cutter what you're doing with it. Sometimes a second pair of eyes can spot trouble before it gets made into a permanent mistake. You can't uncut steel. Lay out the cross trees and clamp them in place on the two uprights. Mark where the two angle braces (if you use them) and the lengthwise cross-members attach. Test fit the pieces in the places they go. Make sure everything lines up before you weld it together. Correct any problems, measurements or alignments. Don't forget the gusset plates. Carry the trailer and clamped pieces to the welder or weld them up yourself if you have the skill. Because the trailer is made of steel, it will be heavier than an aluminum or factory-made trailer. A good recommendation is limiting it to six places. An eight-place trailer may be a little top heavy when fully loaded and could strain the boat trailer.

Weld the two uprights in position as shown in the picture. The uprights should divide each canoe into approximately thirds. Get a good welder to do the job if you aren't one. The welds have to be very very solid. Next weld the cross trees to the uprights. The top one can be welded on top of the upright. Weld gusset plates to the joints between the cross trees and uprights to provide extra support. Measure twice, cut once. Have your welder check your work to make sure everything lines up properly.

Have the welder attach eye-bolts to the ends of each cross member to provide handy tie-down points.

Measure the distance between the front cross member and the trailer hitch. Allow at least 1/3 the length of your longest canoe (6 feet for an 18-foot canoe) plus another couple of feet to allow the vehicle to turn without the canoes digging into the back of the vehicle. If your trailer hitch is too short, you'll have to cut it off and extend it to an adequate length. Your welder can do that easily when he's welding the pieces together.

If you welded well, you shouldn't need any angle braces, but use your own judgment. Now measure and cut two marine-grade plywood sheets to construct a box bottom, sides and lid that will fit into the space over the wheels within the frame. Drill 4 1/2-inch holes in the frame, two on each end, to bolt the box in place. Screw the pieces of the bottom of the box and sides together and fit the box into the space in the trailer frame.


Screw the lid to it's hinges and hasp as shown in the picture. You'll probably want to lock the box while the trailer is left unattended. Some people make the box vertical because you don't have to unload a canoe to open it if you put the door on the end. The problem with that is that when you're driving on narrow roads or it's windy, the wind blows sideways against the broad expanse of plywood and against the big light canoes and can make your trailer dance around dangerously. For safety, lay the box flat. It's not that hard to unload the bottom canoe to get to paddles and life jackets.


When the uprights and cross trees are welded in place, paint the trailer with primer, then a good paint for metal in whatever color you choose. Brighter colors help people to see you when approaching from the rear.

Materials List: 
  1. Used boat trailer
  2. Six tube steel cross-members - 6 to 8 foot, 2 x 2 inch (consult with your steel supplier to recommend the proper thickness of the pipe walls)
  3. Two tube steel uprights - 6 to 8 foot, 2 x 4 inch
  4. Two tube steel lengthwise cross-members - 8 to 10 feet long (depends on trailer length)
  5. 1/8-inch steel plate large enough to cut six 5-inch sided triangles
  6. Four steel strips - 1.5 feet long 1/2 inch wide x 1/4 inch thick (optional) Two marine-grade 1/2 inch 4 x 8 plywood sheets >
  7. Welding machine and supplies
  8. Grinder and disk assortment
  9. Clamps
  10. Two or three large hinges and hasp
  11. 1/2" bolts with nuts and washers, 3 to 4 inches long