Showing posts with label Boats. Show all posts

Tuesday, November 18, 2025

Fixing Scratches on Your Fiberglass Boat

Something to do in the off-season when you're not going to be 
out on the water for a bit.

Repairing scratches on a fiberglass boat is a relatively simple process, albeit a bit on the messy side. You will basically be refilling the gouged out area with new fiberglass. Shallow scratches are easily done. With deep scratches you’ll have a more complicated task ahead of you. Here’s how to do both.

Materials:

  • Epoxy fiberglass resin and hardener
  • Respirator
  • 4-6 oz. E-glass Fiberglass fabric (4 by 8 inch square)
  • Scissors
  • Disposable mixing cup and stirring stick
  • Sharp knife or chisel
  • Sandpaper and sander
  • Acetone
  • Styrene (small bottle)
  • Plastic film
  • Disposable brushes
  • Plastic flexible spreading tool
  • Latex or rubber gloves
  • Duct tape
  • Power buffer and fine grade buffing compound

For Shallow Scratches:

Step 1
Clean the hull around the scratch with soap and water and then wipe with a rag wet with acetone. Wear gloves while handling acetone and all fiberglassing liquids.

Step 2
Drag the point of a knife or corner of a chisel down the scratch to widen it slightly to accept the repair more readily. Lightly hand sand to remove any bits of fiberglass sticking up along the edges of the scratch. When the scratch edges are level with the rest of the hull, you’re ready to go.

Step 3
Mix up a small amount of epoxy based fiberglass resin. For most scratches you’ll use less than a quarter cup of resin.

Step 4
Tease fibers loose from the edges of a piece of lightweight fiberglass fabric with your gloved fingers or a small sharp knife blade. When you have a little pile of them, place the fibers next to the scratch. Dip the fibers into the resin cup and lay them in the scratch. Stagger the threads so their ends overlap. As the fibers fill up the crack, brush lightly over the top with the fiberglass resin. Use the spreader tool to press the resin flat across the top of the crack and smooth out any air bubbles or bumps.

Step 5
Allow the resin to set and cure overnight. Lightly sand with fine sandpaper, and then fine steel wool. Polish and buff with buffing compound to a shine that matches the rest of the boat. For very light scratches, polishing and buffing over the scratch may be all you need to do and you can skip the fiberglass mess.

For Deep Scratches:

Step 1
Use a sharp pointed knife or corner of a chisel or screwdriver to clean out and widen the scratch so the repair material will set better. Clean the area around the scratch and wipe with acetone dampened rag.

Step 2
Lightly sand the edges of the crack to remove any burrs sticking up above the rest of the hull.

Step 3
Mix up a small batch of gelcoat paste. You will have to match the color of the boat. Gelcoat paste repair kits come with a selection of pigments to mix with the paste to match the original color of the boat. This is the hardest part. If you can find a matching color swatch at your local paint store, they can tell you what pigments in what proportions will match your color. You’ll have to do a little math and you will very likely waste several batches of gelcoat paste. Get it as close as you can. Buffing may help disguise any minor color variation. Color the paste BEFORE you add the catalyst. Add the pigments one drop at a time to an ounce of paste in the proper proportions. When the paste looks close to matching, put a drop on the boat hull and check to see how close it is. When it’s right, write down the number of drops of each pigment per ounce for mixing later batches of gelcoat paste. Add the catalyst and stir. Follow the directions that result in hardening in 30 minutes to 2 hours.

Step 4
Wipe the scratch with styrene before applying the gelcoat paste. This reactivates the old gelcoat and helps improve the bond between the old fiberglass and the repair.

Step 5
Spread the paste into the scratch with your spreader. The paste will bulge up a little after the spreader goes over it. Don’t let it bulge too much or you’ll have a lot of sanding to do. Wipe off any excess paste. Cover the gelcoat with a sheet of plastic film and tape it down. Gelcoat won’t fully cure in the air. Let the repair cure for 24 hours. Sand with fine sandpaper, then with very fine wet sandpaper and finally with fine steel wool. Buff with rubbing compound to a high gloss and then give the hull a coat of wax.

Wednesday, June 14, 2017

Water Safety: How to Avoid Capsizing

Well here's another fine mess I've got myself into!


Keep Your Boat From Capsizing


Most boating accidents and injuries in the United States happen because someone's boat capsizes. In fact, capsizing is the number one cause of boating injuries in the summer. It's June and people all over the nation are hitting the water in small boats. People simply over-speed, over-control, overload and over-estimate their skills.  

For some reason when people get around water, especially in the summer, their brains take a kind of holiday from thinking. Perhaps it's because no one is wearing much in the way of clothing. I don't know, but this chronic lack of thinking can lead to tragedy.  Capsizing is the most common sort of tragedy. You see guys out in little fishing boats standing up with a load of fishing gear, maybe wearing waders and a jacket in cooler weather. You see them lumbering around in their boats and then later, when you pass the spot again there are game wardens, cops and county divers searching the water. When they finally do drag them up off the bottom, they always look surprised!

There are some simple common sense rules that will help you prevent your boat from capsizing. If your boat is in danger of capsizing, you need to be prepared in advance to do some quick thinking and even quicker acting. You need a cool head and a thorough understanding of the physics of watercraft. You need to understand buoyancy and balance and the elements of how a boat floats.

Preventing your boat from capsizing happens before you even take your boat out on the water. I know most of us slept through physics class in high school, but boats, whether we like it or not, obey the laws of physics. We may disobey the fish and game laws, but boats obey those physical laws to the letter. It's critical that you understand the basic principles of the physics of small boats and even more crucial that you practice what to do in an emergency in advance.

There are four basic threats that cause boats to capsize. You need to react to them quickly to prevent turning your boat over:
Excessive speed, too little experience.
  1. Overloading - There are two ways to overload your boat. One is by exceeding the weight limit of the boat. Usually, for commercially purchased boats, there's a metal plate on it somewhere that tells you how much weight the boat can carry. They're serious about that.  But total weight is only part of the threat. If you set the weight in the boat too high, you can also overbalance your boat.  Get any weight you are carrying down and centered in the boat. It doesn't matter if you’re in a yacht, a canoe, sailboat, or motorboat, weight that is being carried too high in the boat is most likely to be the cause of your boat capsizing. Especially in rough seas and high winds, get any loose weight in the boat as low as you can, especially if you are in a small boat or canoe. If things get lively have your passengers sit on the floor with their knees low and the weight centered. You don't want all the weight shifting, so tie down any loose heavy object as close to the bottom and center as you can. Fishermen should get down off those tall fishing chairs in a high wind, especially if you're moving the boat. If the boat rocks excessively, sit flat on the bottom of the boat. If you can lower your boat's center of gravity, it makes it much more difficult to capsize.
  2. Excessive speed - Going too fast will kill you quick. If you've ever done a belly flop off the high dive, you know how hard the water feels if you hit it at speed. It can knock the wind out of you and even knock you unconscious. When you are turning or maneuvering or trying to move in a sudden wind, slow Down! Taking off a little speed reduces your chances of capsizing significantly. If you get caught in a sudden squall and heavy waves, don't push it. Maintain enough speed to keep your bows pointed into the waves, but resist the urge to try and jump out of the water. The wind can flip you while you're airborne, given the aerodynamic shape of the hull of a powerboat. In high waves, you want to head roughly into the wind to find shelter. If you move sideways to the wind, the waves can push your boat sideways and cause it to heel over. If you run a gunwale under the water, a sudden high wave can flip you over in a heartbeat. If you're in a sailboat, pay out the mainsheet and allow the sails to spill wind. Pull in the sails just enough to maintain headway, but not enough that the wind can flip you. In very high winds, you may need to drop the mainsail and proceed on your jib if you have one. If you're an accomplished sailor, you may be able to make your way downwind under bare poles if you're good with the tiller.  In any case, reduce sail enough to take the pressure off the sail. You can lower the sail halfway down and tie the loose sail to the mast with bungees and reduce your speed that way. In any case, you need to get to safety, so don’t stop moving. Watch your speed. Keep it down to where you can react fast enough to prevent the boat turning over, but are continually moving toward safe harbor.
  3. Striking an object - The secret to avoiding striking an object is first and foremost, watching where you are going. People get out on the water and thing that because there aren't any trees around, that they can watch the girls in the bikinis in the back of the boat and only have to look ahead once in a while.  Tain't necessarily so. Floating debris can pop up in the blink of an eye. Fallen trees can find their way into your path and they may barely show above water. Lakes often have whole sections where tree stumps left from submerged wooded areas still stick up below the surface.  Know where you are going and if you're not sure how safe an area is, slow down.  Save the speed for when you are in the old river channel or in open sea where there aren't any sandbars. Most such areas are marked on charts of lakes and seashores, but things can change, so don't bet your life. There's a sandbar shallows out in the South Pacific that isn't near an island and doesn't stick up. A ship captain paying attention might spot the rollers over the spot, but they do miss it. The place is a ship's graveyard going back 300 years. It looked like clear seas and then suddenly the ships ran aground.  That can happen in almost any body of water. It's better to be careful till you learn the water, than to get cocky and wind up with a hole in your boat and yourself sailing over the windshield landing headfirst into a stump.
  4. Wind and waves -  Weather has a nasty way of biting you on your nether regions when you least expect it. Check the weather before you go out on the water - always! You have no excuse these days. Smart phones can pull up weather forecasts, complete with radar so you can see storms rolling in before they even cross the horizon. Stay off the water when the wind is high. Your sailboat doesn't need that much wind. Your canoe will get blown away and your power boat can be flipped in the chop. If bad weather approaches, get off the lake. Getting cocky can get you drowned. Worse it can get the people in the boat with you drowned.
 
Even the dog needs a lifejacket!

PRECAUTIONS:
You need some things in your boat before you go out.  First of all you need enough lifejackets for everyone. People who can't swim should wear them. If you're hot-rodding around at speed, everyone needs to wear one. If you're thrown out of the boat and knocked silly without one, you can drown in a very short time.  Your life jackets should have tags showing they are Coast Guard approved personal flotation devices. The game warden or Coast Guard will check. Everyone needs at least a Type II PFD.

You need something to bail with.  Don't go out unless you have something with which you can quickly bail out your boat. A couple of old gallon bleach bottles with the bottoms cut out make great bailers. They have handles and you can secure them in the boat under a seat. Be sure to tie them to something with a long enough rope that you can bail without having to untie them. It helps in a hurry. Tie them with a bowline knot so they won't jam when wet in case you do need to untie them quickly.

Secure any loose objects in the boat. A supply of bungee cords is useful for doing that. Having coolers and tackle boxes sliding around the boat can overbalance you suddenly if you're leaning over the side or reeling in a heavy fish and next thing you know you're over the side or lying across the gunwale with water pouring in.

Keep the boat bailed out.  Water sloshing around in the boat is very heavy and the shifting weight of all that H2O can swamp you in a big hurry.  If you start taking on water, Every free hand needs to join in and bail.  Make sure everyone is throwing water over the side. In a panic, I've seen people scoop up water from the front of the boat and pitch it over their shoulder into the back of the boat. While it might feel good to be moving that much water, it's probably not helping much if it's still in the boat.  When your crew is bailing water, make sure they stay low in the boat while they are doing it. People sometimes get excited when water is coming into the boat and try to stand up in the boat. If there's a lot of water sloshing around in the bottom of the boat, standing up can lead to disaster. Always bail water from a kneeling or sitting position if at all possible.

If you’ve struck something and knocked a hole in your boat, you want to close the hole as quickly as you can.  A rag or shirt stuffed into the hole can slow the leak enough so that combined with bailing by the crew, you can make it to safety.

Head for cover as quickly as you can while maintaining a safe speed. Try to spot a sheltered cove or bay, especially if you are facing high winds and heavy seas. In a sudden squall, you'll have to crab your way toward where you want to go, keeping the bow of the boat into the wind and waves while slipping sideways in the troughs to prevent the waves from capsizing you. Angle our way across the fronts of waves turning your bow into the wave as you crest the wave. As you come down the backside you'll angle in the direction you want to go, then turn again into the wave as you rise back up on the next wave. This requires some skill at steering, but you should have already practiced your steering before you ever go out, especially with passengers. Always familiarize yourself with the how your boat responds to the tiller. If you're in a canoe, know how to steer with efficient paddle strokes. Do your practicing in calm weather in a sheltered place before you venture out into waters that can suddenly become choppy or into strong currents.

DON'T PANIC as the Hitchhiker's Guide to the Galaxy recommends in big friendly letters on the cover. If you know your boat and you've practiced with it and take the precautions we've suggested above, you should be okay. The two deadliest things, that will kill you out on the water, are arrogance and ignorance.  Be smart and be skilled and know your boat.

Have fun out there on the blue water!

© 2017 by Tom King


References:

Andrew Kim Law Firm: Common Causes of Capsizing Boats

The Bass Report; Preventing Capsizing

The Florida Course – Boater Education: Boating Emergencies - What to Do


Monday, February 06, 2017

Homemade Anchors - The Concrete Jug

Spring is approaching and fishing season looms.  Here's a quick and cheap anchor for your canoe, rowboat, Jon boat, skiff or other small craft to keep you from drifting while you're fishing.

Materials:
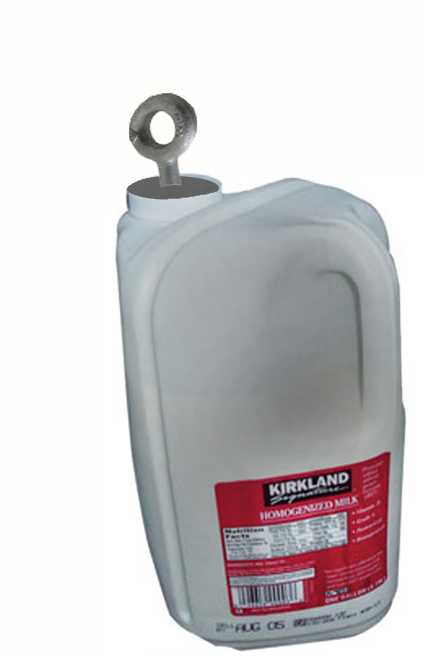
  • Half gallon plastic jug - Use a bottle with as thick a plastic as possible. The plastic protects your boat's finish when you're pulling the anchor back on board. A squared milk jug works even better because the mouth tends to be larger and it won't roll around in the bottom of the boat.
  • Concrete mix with small aggregate.
  • Half inch x 6" plus eyebolt with nut 
  • Half inch nylon or polyethylene rope


Method:
  1. Mix concrete with water to make a thin but not watery mixture - about the consistency of oatmeal.  
  2. Pour the concrete mix into the plastic bottle and fill to the top
  3. Screw the nut on the bottom of the eyebolt and shove it into the mouth of the bottle so that the eye sticks out the top.
  4. Allow the concrete to set hard.
  5. Tie 50 feet of half inch rope to the bottle through the eyebolt or the handle. Use a bowline knot so it won't slip and so you will be able to untie it if you need to replace the rope or change the configuration of the rope in some way. 
Notes:

This anchor is heavy, but it may drag. There are no tangs so if there's a breeze you may move a little bit as the jug drags over the bottom. It's usually easy to drag up at the end of the day for that reason, though. Because it's plastic, the anchor will last a long while. Eventually the plastic bottle may degrade and fall apart. Just peel off the old plastic an the anchor will still work. You'll probably want to cover it with something to keep it from scratching your boat.

Friday, January 27, 2017

How to Avoid Capsizing

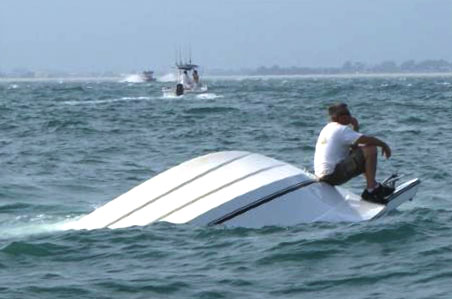
The weight was too high. Wanna bet?

Introduction

It's wintertime. In winter, the water is very cold. Once you fall out of your boat, you are NOT going to last very long. The number one cause of boating injuries in the United States is capsizing. Most capsizes are preventable. What it takes is a cool head and some mighty quick thinking. But that's not all. The most important thing you need to understand is how your boat is constructed, how it floats, how it balances, how buoyant it is and how it moves through the water. 

So when you take out a boat, it's critical that you already have a plan for what you are going to do in an emergency.

There are four major factors in the majority of boat capsizings.
They are:
More than half the overloaded boats escaping from
Vietnam after the fall of S. Vietnam are believed to

have capsized in rough seas and sank with all hands.
  1. Overloading
  2. Excessive speed
  3. Large waves and winds
  4. Obstructions struck by the boat at speed
Things you should have in the boat or be aware of: 
  • All loose objects in the boat - anything that might shift around
  • Lifejackets, ring buoys, rescue tubes, and floating boat cushions
  • Something to bail with
Here's what you should look out for:
  • Disturbances on the water - In rivers look for billows in the moving waters. At sea look for wave forms that are higher than surrounding waves where they are breaking over shallow rocks, sand bars or other obstructions.
  • Gusts of wind, sudden squalls or suddenly larger waves
  • Narrow channels, oncoming boats or anything that might cause you to swerve suddenly.
  • Objects floating in the water.
  • Sluggish performance, water coming into the boat or slow recovery after turns.
 Staying Upright:
  1. If you are sailing, wind is your biggest threat. Things are a little different in a sailboat when things get rough. First spill wind, reduce sail to reduce speed. This gives you time to think and act defensively. If the wind is becoming dangerous and you're in a small boat, you need to get to safety, so don’t stop moving. Spilling wind gives you time to assess what's happening around you and to your boat. Be prepared to dump wind fast to keep from being blown over. You'll need to have one hand on the mainsheet and one on the rudder. Turn her into the wind as much as possible or, if you need to head downwind, angle downwind. Avoid heading straight downwind in heavy seas as much as possible to avoid tipping forward or driving the bow underwater and swamping the boat.
  2. Move as much loose weight (including people) down low and toward the center of the
    boat.
    If you are in a canoe have passengers and gear sit flat on the bottom. In a motorboat or fishing boat, get everyone into lower seats. No standing; no sitting up in the fishing chairs. If the water is flat or calm, and the boat is in danger of capsizing, then likely the weight is too high or too heavy for the shape of the hull or the size of the boat. Be sure to get heavy objects down low and secure them so the can't shift around. The lower your boat's center of gravity, the less likely it is to capsize.
    Note the lack of lifejackets. Capsizing happens
    fast. Once you go over there's not time to look
    for a lifejacket and that can cost you your life.
  3. If things get rough, make sure you get life jackets onto everyone. The law requires a Coast Guard approved life vest (minimum Type II) for everyone in the boat for a reason. If things get dicey or you're going fast, make everyone put on their jackets. Capsizes can happen very quickly, separating you from a life jacket and safety. The same wind that blew your boat over will blow away flotation devices faster than you can swim after them in cold water with hypothermia threatening to all kind of wreck your swimming skills.
  4. If water comes in, bail it out quickly. Water is very heavy stuff. If it's sloshing around in the boat, you've got a lot of weight shifting wildly and messing up your center of gravity. Water loose in the bottom of the boat can flip you in a heartbeat. In rough conditions, you want every free hand bailing out water as quickly as possible. Make sure anyone bailing stays low in the boat to keep anyone who is bailing down low in the boat while bailing. Keep everyone from getting excited. People have a bad habit of standing up in the boat when water comes in causing the boat to capsize. Bail water from a kneeling position or sitting if at all possible.
  5. Close up any holes if you struck something. Locate where water is coming in and stuff something bulky into the hole to slow the leak. It may be more effective to stuff something in from the outside if you can safely reach the hole without tipping the boat over.
  6. Took too little action too late...
  7. Head for safety. There are two ways to do this. If you are close enough to shore, work your way into a bay or a sheltered cove or bay if you can get there safely. If you see a squall or wind storm coming up and you can make it to sheltered water, you can weather a storm by anchoring or running your boat up on shoe. Where the wind is strong, turn your boat into the waves and crab your way sideways angling toward shelter. Angle across the wave fronts. You need considerable skills to maneuver this way. If you haven't the skill don't try it. It's better to ride out the storm.  You can rig a sea anchor by tying a jug of water or something bulky that floats to the stern of the boat so that it pulls the bow around to face into the waves.  
Final notes:

Maneuvering is dangerous. This requires some serious skill.  Always take some time to familiarize yourself with your boat while the conditions are calm or you're in a sheltered place. Always know your boat before going out into potentially rough waters.


References:

Andrew Kim Law Firm: Common Causes of Capsizing Boats

The Bass Report; Preventing Capsizing

The Florida Course – Boater Education: Boating Emergencies - What to Do
http://www.boat-ed.com/fl/course/p5-2_boatingaccidents_ada.htm

© 2017 by Tom King


Tuesday, March 01, 2016

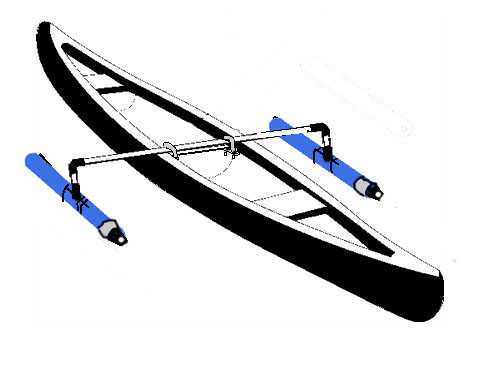
Boats & Floaty Things: The Homemade Canoe Stabilizer.


It's coming on springtime and time to get out on the water in the old canoe; perhaps to do a little fishing.  A canoe, by it's very nature is an unstable platform for fishing. In fact, any activity that involves a lot of moving around heavy equipment, standing or climbing into and out of the boat in deep water. Canoes are not good platforms for scuba diving and they definitely are not the best watercraft to stand up in and wrestle with an active trout, pike or other large fish, unless, of course you like being pitched headlong into cold water while weighted down with fishing gear. My whole life, I would hear news reports almost every other weekend of the fishing season of sheriff's department divers searching the lakes, rivers and bayous for some fisherman's water-logged corpse after he'd fallen overboard from some unstable boat. 

If all you have is a canoe, however, there's good news.  An easy solution to the instability of a cone was invented centuries ago by the Polynesians. The Pacific Islanders for millennia only had coconut palms and other skinny trees from which to hollow out boats for themselves. Skinny trees do not make for stable watercraft and the sea is a wild and wavy place. So these clever folk created outriggers for their sea borne canoes to increase their stability. There are a lot of commercial outrigger setups that are available for canoes, but they can be relatively expensive, especially if you're only using the canoe for fishing rarely. Here's an effective solution. It's not terribly stylish, but it will keep you from drowning yourself while fishing by making your boat less tipsy.

The trouble is that canoe-based fishermen may forget, in their excitement to get out there and hook themselves a lunker, that the water is still cold. Fall in and hypothermia may get you before you can get to shore, particularly if you're wearing a heavy jacket, boots or are loaded down with one of those vest with all the pockets and you have a lot of led sinkers stuffed in a few compartments.

Here's what you need to make this.

Tools:

  • Zip ties
  • PVC cleaner
  • PVC cement
  • Knife
  • Hacksaw

Materials:

  • Styrofoam swimming “noodle” with hole in the center
  • 12 feet of 1 inch heavy duty (stiff) PVC pipe
  • Two 1 inch PVC “T’s”
  • Two 90 degree 1 inch PVC elbows
  • Two large u-bolts. They should be wide enough to fit over the center thwart of your canoe and long enough to clamp the thwart and 1 inch pipe together
How to put it together:

  • Measure and cut the pipe - Measure the width of your canoe at the center thwart (the one you will
    Crossmember with elbows cemented in place
    clamp this rig to.  Add enough length to it so the pipe extends 12 to 18 inches beyond the gunwales of your canoe.  If, for instance, your canoe is 22 inches wide, add ag least 24 to 36 inches to the width of the canoe and cut the pipe that long. The reason for giving you a range is so you can adjust it to your own preferences. A shorter outrigger pole is less stable, but more stiff, so it flexes less when you are standing in the boat. The longer length will make your outrigger more tip resistant, but less strong and more prone to flexing. If you want a longer outrigger that is more stiff, simply buy a heavier gauge pipe. You cold even use a light metal pipe of the sort used in electrical conduit, but it will significantly increase your cost and may not help that much.
  • Once you've cut the pipe, cement the two 90-degree elbows to ends of pipe so that both openings.
    Crossmember with down pipes and T's in place
    When attached both elbows will need to turn downward.  The cementing part is easy. Clean the ends of the pipe and the insides of the elbows with PVC cleaner. Spread the pipe glue on the outside of the pipe and inside of the elbow and push them together.  The cement will set pretty quickly.
  • Cut two 4" to 6" pieces of 1 inch pipe and glue them to the open ends of the elbows so you have both pointing the same direction (downward when the rig is in place).

  • Now glue the two PVC “T’s” to the end of the down pipes so that their openings are perpendicular to the cross pipe.  The openings should be parallel to the sides of the canoe.
  • With a knife, cut two 24 to 27 inch long pieces from the Styrofoam swim noodle.
  •  Slit the noodles lengthwise so the cut goes halfway through to the hollow center of each noodle.
  • Now you'll need to cut four pieces of pipe so that they are 12 to 14 inches long. Measure and cut
    Noodles wrapped over perpendicular pipes
    the pipes so that with one stuck into each of the openings of the PVC T's will equal the same length as the piece of swim noodle that will be your outrigger's flotation.  
  • Cement one pipe into each end of the two T's.  Let the pieces set for ten minutes before moving the framework around.
  • Now pry apart the lengthwise slits in the Styrofoam noodles wrap them around the pipe assemblies attached to the "T's".  The pipe should settle down into the hole at the center of the noodle. You'll have to push the “T” down into the slit and there will be a gap there. You can trim around it with your knife for a close fit or just pull it tight with the zip ties. Your choice. When you are done you'll have two stiffened foam floats running parallel to the sides of your boat once the cross-member is clamped into place

  • Wrap zip ties around the noodles spaced evenly along either side of the “T’ joint to hold them in
    Zip tie close to T's then space along length of noodles
    place.

  • An easy way to streamline your outriggers and cut drag is to cut the bottom out of 12 ounce water or soda bottles.  With a screwing motion you can force them over the ends of the foam noodles. Once they are in place, wrap a few turns of duct tape around them to hold them in place. If you want something more permanent, you could drill through the bottles, the foam and the pipes underneath and run a small bolt through it all and add flat washers to both ends and lock washers to the nut side to hold it in place. I wouldn't go that far, though. I always keep some duct tape with the boat for repairs. If the tape gets soggy, just replace it. 
  • With your U-bolts clamp the cross member to the center thwart. I'd pad the thwart between the
    Bolt crossmember in place, Cover ends of noodles
    with soda bottles for streamlining effect
    bolt and the thwart to prevent scratching but that's up to you. An easier way is to zip tie the outrigger/stabilizer cross member to the center thwart with heavy duty zip ties and you’re ready to go. 
You may have to fiddle with duct tape or something to keep the cross member for rotating or sliding right or left. You could custom design some sort of over and under shaped wood mounting saddle for the cross member with bolts and wing nuts to hold it in place.


References for commercial resources:


Outrigger Stabilizers for Canoes and Boats: Castlecraft

Canoe Stabilizer: Sailboats to Go

Outriggers for Canoes: Easy Rider Kayaks

Dan’s Kayak

Canoe outriggers to stabilize your canoe: RM Specialites
http://www.canoeoutriggers.com/

© 2016 by Tom King

Saturday, December 05, 2015

Boats and Floaty Things: Homemade Drift Sock

This is a commercial drift sock with a durable
straps sewn over the cone for added strength.
I'm basically a canoer with occasional lapses into fishing. I've never been a big fisherman. I'm kind of ADHD and don't have a lot of patience. Frankly my sympathies have always lain with the fish. But, anytime your doing stuff in a boat, you may find yourself needing to sit somewhere on the water without drifting into the weeds.  I've used this little trick to park offshore and do nature photography. If you're into murdering like, Bambi and Thumper you could probably make your canoe or boat or raft sit still for you using a home-made drift sock.


This thing we're going to make is a takeoff of an old sailor's trick called a sea anchor. Basically, a sea anchor is a line or chain, attached to a boat at one end and to a big something or other full of water at the other end. You can also use something like this to help keep your nose into the wind or your boat on course in a heavy breeze. A drift anchor is a smaller version of the sea anchor and comes in very handy in high winds or choppy seas. A very small one can be used to help you stay on course at the cost of a little drag. If you've ever tried to paddle in a stiff breeze, keeping the boat on course can be a real challenge. Even a small motorized skiff can struggle to stay on course for home if a wind comes up.

We sailors are nothing, if not innovators. There are several ways to go at making a drift sock. The quickest is to tie a line to a five gallon bucket and throw it overboard, tying the other end to the loop on the stern of your canoe or to a yoke at the end of a rowboat or skiff.  You can use a smaller bucket if you're trying to keep the boat turned into the wind. A larger bucket will help you not to drift. I've even seen a workable drift sock made from an open umbrella tied by the handle to a drag line behind the boat. 

Here are several other ways to create a quick emergency drift sock. You can fill a garbage bag with water and drag it along behind the boat. One interesting solution I've seen involves tying 4 to 6 ropes to the hem of a dress like a parachute. A bit of wire can be used to keep the dress open. Don't sew up the top of the dress (use a dress not a skirt).  The skirt part will balloon out as you start moving and catch a lot of water. As the water hits the waste of the dress, it slows because the hole is smaller.  The narrowing at the top will slow the forward motion by funneling the water together while still allowing it to pass through so that the dress doesn't act like a parachute and kill your motion altogether.

You can buy a commercial drift sock for $20 to $100 depending on the size of your boat and the amount of freeboard it exposes to the wind. If you have a low profile canoe, you can get away with a smaller drift sock. An Indian-style canoe with high gunwales is a lot more lively in a stiff breeze. A drift sock is simple a cone shaped something or other that is held open at one end and narrow or closed at the opposite.  Commercial ones are made of durable rip-stop nylon or canvas. You can make one yourself by taking a piece of nylon, canvas or polyester and stitching it into a cone shape. At the wide end, hem a wire loop into the edge of the cone. Add 4 grommets evenly spaced around the large end just below the hem. Most craft stores have two or three foot wire hoops that work nicely in this application.

To attach it to the boat, create a simple harness. Tie four ropes or some parachute cord to the 4 grommets at the large end and tie them to a steel loop or carabiner about 4 to 6 feet from the cone.  Then clip the carabiner to a line that you attach to the stern of the boat and drag behind it. If you're lucky, the stern of your boat has a cleat or loop you can attach the drift sock to and you won't have to jerry-rig it. It's not hard to do in any case.

To set up your sock to prevent your boat from drifting, throw the drift sock downwind of the boat and let it fill up. It won't stop you from drifting entirely, but it drag will definitely slow you down in a stiff breeze.


© 2015 by Tom King