Showing posts with label homemade musical instruments. Show all posts

Tuesday, May 30, 2023

Building the Homemade Cajón (Peruvian Drum)

You may have never heard of a folk instrument called a cajón. You may have seen one and not realized it was a drum. We smuggled one into our special music one Sabbath. Our church at the time had an older congregation who looked askance at percussion instruments in the sanctuary. We'd have never got a drum set approved by the church board. Turns out one of our kids sat on a a cajón playing soft percussion to fill out the guitars, bass and violin for several weeks before someone twigged to the fact that Bobby wasn't just sitting on a box, but had been playing it all along. People heard something that sounded like percussion, but couldn't figure out where it was coming from. The cajón helped desensitize our older more traditional members to the presence of a percussion instruments in church. Later he was able to play it with brushes and drumsticks (gently of course).

A cajón is shaped like a box, about the size to offer the drummer a comfortable seat. It can have a sound hole in it, slits, or no hole at all. Some mike them up with piezo-electric or other types of instrument pickups. You slap the front or rear faces, even the sides, with the hands or fingers mostly, but some drummers use brushes, mallets, or drumsticks. Cajones are widely used in South America and Africa, in Latin American music, Afro-Peruvian music as well as Mexican folk music, flamenco and  the Cuban cajón de rumba and the Mexican cajón de tapeo. 

The cajón comes originally from Peru. The cajón takes three main forms: the bass box drum, the middle drum, and the solo drum. It is believed that the bass box drum was originally developed from wood salvaged from shipping crates. The crates were large enough for the percussionist to sit on top of it. The middle drum is thought to have come from a smaller shipping box used to ship church candles. The middle drum is played with spoons rather than palms and fingers. The first solo drum may have originated from a salvaged desk drawer. Modern cajónes may be made of metal or plastic, which is up to you, but it feels blasphemous to use anything but wood.


A cajón tends to be a very personal instrument.
Drummers often build their own boxes, alter the design and may use several woods to get a different tone to each face. One guy I know of builds the front from Masonite and uses three different types of wood for three different tones - one for each of the other sides. This allows him to vary the sound of the beats as though you had multiple drums.

Check lumber dealers in your area that deal in hardwoods and specialty woods.
Cruise the internet for specialty wood dealers in your area. But don't necessarily depend on store-bought wood for your cajón. Old furniture can also provide you with some unique solid wood pieces in maple, mahogany, pine, cherry, and lots of other woods. You want to checked out the wood's tonal qualities in person as well as the looks of the wood. The body of the cajón is usually open on the bottom and sits flat on the floor, but if you want to skip cutting a hole in your lovely wooden drum faces, you can add short legs to lift the box off the floor to let the sound out from beneath.

One way to determine the wood tone and timbre of each wooden side is to build a plywood box the size of a cajon and leave one side off. Then simply lay the wood you are considering using and beat on it so you can hear the tone. Try different types of wood until you find a wood type that gives you the tone you like - thicker sides and thin sides. Some specialty wood dealers will let you bring your box to the store and experiment with pieces of wood they have for sale. Thinner pieces of wood will give you louder sounds when using hands, fingers or brushes. Thicker pieces may be more of a tone you want if you are using drumsticks or mallets

If it were me I'd try a variety of woods and a variety of thicknesses. I like wood salvaged from old furniture that's being trashed. You might start with maple, rock maple, cedar or spruce at first. Then give some more exotic woods a try. Make your cajón completely unique. A luthier friend once found some old growth Black Forest lumber that had been sitting in a shed in Germany for a hundred years and made violins with it using a Stradivarius pattern. They sounded wonderful. 

Also, don't discount the value of lumber from old buildings and old discarded furniture. Sometimes you can find the most beautiful sounding wood in abandoned buildings and on scrap heaps. Also try antique stores. Look for damaged furniture that the proprietor has pushed into a back room and forgotten. Old table and desktops can even be cut up to make the thicker pieces of your cajón. 

Depending on your woodworking skills you can build a cajón with whatever joining scheme you're comfortable with. If you're really good, you can fasten the sides and tops with dove-tail joints. This makes for some beautiful work You can also glue the sides and top together. You can screw it together, nail it together, or whatever you like best. You can pad the top (seat) if you want - it will certainly make the seat more comfortable. It doesn't make much if any difference in the sound. Your butt will serve to deaden the top anyway.

There are several ways to add a snare effect to your cajón. There are some add-on devices that can be attached to the cajón to create a snare effect. Another way to do this is to add 4 paired screws inside one of the thinner faces of the box and attach 4 steel guitar strings between each pair of screws - the unwound ones E, B, or G.  Tighten or loosen the strings to get the snare sound you're looking for. 

As you can see there's a lot of room for creativity in assembling your cajón. Check out the references below to get further information before diving into your project. They might suggest some ideas you can use to get just the right sound you're looking for.


© 2023 by Tom King

References:

  1. https://www.instructables.com/Adjusting-a-Cajons-Snare/
  2.  https://cajonbox.com/2012/03/31/tuning-your-cajon/
  3. https://www.fuelrocks.com/how-to-build-a-cajon-with-guitar-strings/
  4. https://lousondrums.com/products/floating-external-snare-system-for-cajon-and-cajontab


Saturday, August 28, 2021

Building the Longneck Squared Eel Banjo


I spent three years teaching English to Chinese children. These kids are smart and driven (mostly by their parents). I once had to do a phonics intensive version of See-Saw Margery Daw so I put down the puppets and ran and grabbed my Squared Eel to play along. The kids are fascinated by my home-built Mike Gregory classic.

I owe a lot to Michael. He single-handledly restored me to the company of active banjo players.  I lost two banjos and two guitars in moving to Washington State with my wife. She went on ahead. We were broke and family invited us to come up and "help" with a sick relative. We were supposedly never going to have to worry about a place to live again. We arrived on a wing and a prayer. We paid my wife's entire disability check for rent and she did all the housework and I did the cooking. That arrangement lasted a year until the friction between the alpha dog and myself (a junkyard dog that isn't impressed by authority figures) became too stressful. We crammed our worldly goods in a storage unit and embarked on a month-long sojourn as homeless people.

God helped us find a place and we settled in. It wasn't long before I began trying to figure out how to get my hands on another banjo. Like the proverbial white knight, in rode Michael Gregory in his top hat and soon I received a package of parts from him which purported to contain almost everything I needed to make a genuine Squared Eel as demonstrated here by Johnny Button. My heart leaped for joy! The parts (below) looked decidedly unsophisticated, but wonderful things often come in simple clothing.


Mike suggested an alternative head material in the note he sent with it - a plastic soda bottle. That started me on a whole chain of fun modifications to the basic Squared Eel. Briefly my modifications included the soda bottle head, made by cutting apart a 3 liter soda bottle into the largest flat piece possible (by removing the top and bottom). I followed Mike's instruction for assembling the neck, head and base. I stretched the pop bottle plastic over the rectangular head space, put down some powerful glue pressed down the plastic and then proceeded to secure the edges by hammering gold decorative tacks at regular intervals around the head. Then, following directions, I applied a hair dryer to the head and was tickled to see the head stretch taut over the frame. Not only that but after I trimmed the excess plastic it looked marvelous.

One problem!  I set the neck a little too low and with the bridge at standard height over the head was too high over what was to be my fretboard. Mike has this nifty design using old windshield wiper blades for frets, It became clear however I was going to have to add a fretboard material over it. Then I got a Stewart McDonald catalog in the mail and low and behold I found I could get a standard guitar fretboard for about 20 bucks. So I ordered one. Along with it I got a nice bridge and nut precut for a five string banjo. As you can tell from the picture the cut of the pieces is pretty simple and glue up is something you can do with hide glue bungee cords and rubber bands.

The basic structure looks like this. It's ready for the tuners, fretboard and head.

When the fretboard arrived I found that if I pushed the top of the fretboard up against the nut, I had some gap space at the bottom of the neck between the board and the pot.  The measurement for the bridge put the bridge a little high on the pot. So I measured what the length needed to be to make it into a longneck banjo and lo' and behold, the neck was long enough. Sooooooo, I downloaded a template for a longneck fretboard from the Internet and moved the guitar fretboard so that the top of the fretboard lined up with the third fret mark from the nut. Then I added a thin piece of hardwood the same thickness as the fretboard between the nut and my commercial fretboard and glued it to the top of the neck.

I clamped the ears together and attached them
to the end of the neck instead of the sides as
Mike does, thus creating a longneck banjo.

Here's where Mikes wire windshield wiper core frets came in handy. You can also buy fret wire from Stew-Mac if you'd rather. I sawed the fret kerfs into the upper fretboard and tapped the wire into the grooves. I clipped the ends of the fret wire and rounded the rough edges on the ends with my trusty Dremel Moto-Tool. I may one day stain the upper section to match the lower fretboard but at the time I was more interested in finishing the project.  Instead of a tailpiece, I used screws and looped the ends over those. I had to fiddle with the bridge a little to get the strings to the right height. I wound up shortening the bridge and deepening the grooves on the nut, but I wound up with a satisfactory action when I was done.

You may wonder about the width of the guitar fretboard. That worked out to be a surprising bonus deal for a longneck banjo of the sort I wanted. The overlap where the sixth string goes hangs over the top edge of the neck. Once I put in the block for the fifth string, I discovered that the resulting lip allowed me to use a small plastic furniture clamp as a fifth string capo. Best one I ever had!  With a longneck, your capo gets a real workout and this feature allowed me to avoid retuning the fifth string when I went for the lower or higher frets from standard.

Clamped the heel of the pot, glued
and bungeed the headstock to get
the level fretboard and angle the
headstock.


One other thing I did, was beef up the headstock by drilling a hole as shown and both gluing and screwing the headstock into place. I made one modification after I took this photo.  I removed the headstock and cut the end of the neck at a slight angle and reglued and rescrewed it into place. The headstock as you can see in the finished photos, is canted back a little bit which gives the strings more purchase against the nut and seems to reduce detuning when you play. You can see the tuners installed in this view.

I next stuck a screw eye on the front edge of the pot and looped an old leather belt and attached the ends to the eye. It made a dandy banjo strap. The final product makes a nice little banjo with a funky soft sound. To ease stress on the neck I used nylon classical guitar strings with an extra e-string for the fifth string. MIke uses fishing line, but I actually had an extra set of classical string in a drawer, so I used those. The tuners were simple standard banjo tuners. The ones I used were nice tuners and don't require a lot of retuning when you're playing it.

I had so much fun making this banjo and I've played it for church services so it sounds pretty good and is easy to play. Here's a video of me playing my new Squared Eel after a four year hiatus from banjo playing. It ain't great, but it's recognizable as Cripple Creek.


Here you can see the basic Squared Eel ready for the fretboard and the finished head attached to the pot. I stained and varnished the wood and put wood button plugs into the screw holes to give the pot a finished look. You can see two of the buttons on the butt end of the pot.


Here you can see down the length of the neck of the finished longneck version of the Eel. You can see where the fretboard overhangs the neck under the fifth string allowing you to use a small furniture clamp to capo the fifth string. You can also see where the commercial fretboard and the add-on fretboard I made. I got some experience installing frets doing that little bit. It was satisfying discovering that I could install frets accurately.

You can see the headstock and the top 3 frets more clearly here.

Even if you have a store-bought banjo, this thing is a bunch of fun to build and Michael sells the kit pretty cheaply. Thanks Mike. You're the man!

- Tom


 Here's me playing the beast.


Friday, June 22, 2012

How to Build a Cookie Tin Banjo

Introduction

You don't build a banjo out of a cookie tin because you're looking to add a professional-quality instrument to your stable of banjos. You build one of these unusual musical instruments because you like the idea of playing an instrument you built with your own two hands. The hardest part is finding the perfect cookie tin or metal fruitcake box to build your funky new banjo around. This post was contributed by my good friend Mike Gregory.

Materials:

  • Neck Wood, 1 by 2 by 48 inch firring strips
  • Cookie tin
  • Small coping saw
  • Rotary-Tool and metal cutoff blades
  • Drill with 1/16th and a 3/8 bit.
  • Hot glue gun and glue sticks
  • Sheet-metal screws, ¼ inch by ½ inch long
  • Phillips head screws, 3/8 inches long
  • Rubber bands for clamping
  • 100 and 150 grit sandpaper.
  • Pencil
  • Magic Marker
  • Tape measure with inches AND metric markings
  • Small carpenter's square.
  • Phillips head screwdriver.
  • Wood glue
  • 5-string banjo nut (plastic string guide for the peghead)
  • 5 eyebolts, ¼ inch by 2- 1/2 inches long.
  • 1-1/4 inch wood screws, 2 each
  • Fiberglas-reinforced strapping tape
  • 2 Machine screws, 6/32 by 1-1/2 inch
  • Nail or Icepick
  • Knife with disposable blades
  • Hammer
  • #16 brass tacks
  • Set of banjo strings
  • 5-string banjo bridge

Step 1
Photo 3 by Lorna Wells
Select a cookie tin at least 10 inches in diameter. Cut the neck wood into two pieces, one 24 inches long and one the width of the tin plus three inches. One end of the smaller piece will fit inside the tin.

Step 2
Lay the edge of the cookie tin on the end of the shorter neck piece and mark the curve of the tin on the heel of the short neck piece. Cut the curve in the neck piece so it will rest securely against the inside of the tin at thje far end from the neck.

Step 3
Cut a rectangle the size and shape of the end of the small neck piece in one side of the cookie-tin. Slide the small neck piece through resting the hole and push the butt end against the opposite side of the cookie-tin. Drill through the cookie-tin and screw the end of the short neck piece in place. The other end should extend through the hole and 3 inches beyond the cookie-tin. Hot glue around the opening where the neck passes through the tin. Set the tin aside.

Step 4
Photo 1 by Mike Gregory
Sand the last 5 inches of the 24 inch neck piece flat on the top and bottom for the peg head. Glue two 1-inch wide strips of firring five inches long to the sides of the peg head. Wrap with rubber bands till set. Trim the edges of the peg head and sand them round. Drill four 3/8 inch holes for the eye bolts you will use for tuners. Make 2 holes at the top and two at the bottom of the peg head, far enough apart that your fingers can turn the bolts without bumping into other eyebolts.

Step 5
Sand the “ears“** and back of the neck smooth. Round the back with sandpaper except for the bottom 3 inches of the long neck piece.


Photo 2 by Mike Gregory
Step 6
Mark a line straight across the neck five inches below the top of the peg head. Use a square to make the line perfectly straight.* Cut a shallow groove in the neck with the coping saw on the line you marked. Measure and mark lines at the following distances from the first groove. Distances are in millimeters. Cut the second groove at 29.9 millimeters, 58.2, 85, 110.02, 134.00, 156, 177.6. 197.7, 216.5, 234.4, 251.2. 267.1, 282.1, 296.2, 309.5, 322.2, 334.1, and at 345.3 millimeters


Photo 4 by Mike Gregory
Step 7
Glue a 5 inch long 1 by 1strip to the left side of the neck between the 8th and 11th strip. Wrap with rubber bands and allow to set. Drill a 3/8 inch hole in the side an inch below the top for the 5th string peg. Screw a short slot screw into the top of the strip as a guide for the fifth string.

Step 8
Glue and screw the ends of the long neck and peghead piece to the 3 inch piece of the short neck piece that is sticking out of the cookie-tin. Allow the glue to set and dry.


Step 9
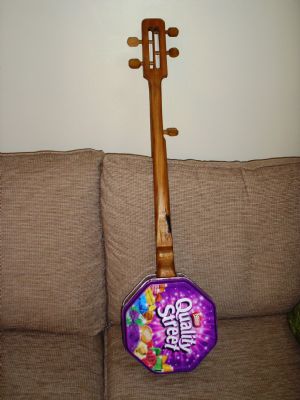
Octagonal Banjo - Photo by Roger
Screw two short flathead screws through the bottom (now the face of the banjo head) of the cookie-tin just behind where the neck enters the tin and near the base of the short neck piece. You may need to insert thin wooden spacers to keep from bending the bottom of the cookie-tin. Drive 5 brass tacks into the end of the cookie-tin. Don't drive them all the way in. Leave a quarter inch of the tacks sticking up to loop the ends of the strings around.

Step 10
Glue the nut into the groove at the top of the fretboard below the peghead. You may have to widen or deepen the groove to lower the nut so that the strings will be 3/16 inches high.


Colorful cookie tin back - Photo by Roger
Step 11
Wrap the threads of the quarter inch eyebolts with fiberglass tape and screw into the holes you drilled in the peghead and side of the neck. Put the lid on the bottom of the cookie-tin and hook the loop end of the strings over the tacks in the correct order and then string them down the neck to the appropriate eyebolts.

Step 12
Twist the strings finger tight. Slip the bridge under the strings on the head and stand it upright. Tighten a string till a clear note sounds. When you play the string open and then fret it on the 12th fret, the two notes should be in tune an octave apart. Move the bridge forward or backward to adjust the tune. When it's right, tighten the strings and tune.


Chief Designer - Mike Gregory

Technical Writer - Tom King


Resources:
  1. CB Gitty Crafter Supply
  2. Desert Rose Banjo: Intonation Problems
  3. Lumber Jocks: Cookie Tin Banjo
  4. PlanetGaa: GAA's Cookie Tin Banjo
  5. IMF: Building a Cookie-tin (Backpacking) Banjo


Notes: 

Photo 1 - Mike Gregory’s ears being glued on
The ears go on square, and get cut to shape after. Since the client is paying extras, I used a maple slat from a discarded futon, instead of the usual plain firring strip.

Photo 2 - Mike’s Ladder stencil
“Since I mass produce cookie-tin banjos, I made a stencil out of scrap oak, and some aluminum bars and some brass bars. A 1x2 firring strip slips in, and a couple eyebolts with teenuts hold it steady, while the inked points of the casing wheel mark the frets.”

Photo 3 - Job well done
Completed cookie tin banjo by Lorna Wells, Tuscon Arizona

Photo 4 - Mike’s comment
Asked the client if he wanted a Danish Butter Cookie tin, for best sound, or an artsy picture of some classy broad. Turns out he's a broad-minded lover of the arts.

Photo 5 & 6 - Unusual Cookie Tin Shape
Roger , Much Wenlock,  England