Introduction
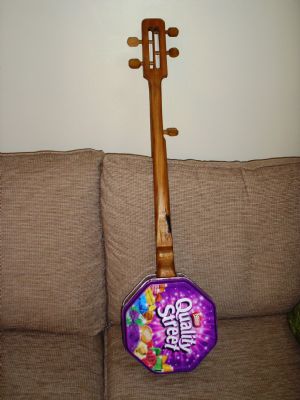
You don't build a banjo out of a cookie tin because you're looking to add a professional-quality instrument to your stable of banjos. You build one of these unusual musical instruments because you like the idea of playing an instrument you built with your own two hands. The hardest part is finding the perfect cookie tin or metal fruitcake box to build your funky new banjo around. This post was contributed by my good friend
Mike Gregory.
Materials:
-
Neck Wood, 1 by 2 by 48 inch firring strips
-
Cookie tin
-
Small coping saw
-
Rotary-Tool and metal cutoff blades
-
Drill with 1/16th and a 3/8 bit.
-
Hot glue gun and glue sticks
-
Sheet-metal screws, ¼ inch by ½ inch long
-
Phillips head screws, 3/8 inches long
-
Rubber bands for clamping
-
100 and 150 grit sandpaper.
-
Pencil
-
Magic Marker
-
Tape measure with inches AND metric markings
-
Small carpenter's square.
-
Phillips head screwdriver.
-
Wood glue
-
5-string banjo nut (plastic string guide for the peghead)
-
5 eyebolts, ¼ inch by 2- 1/2 inches long.
-
1-1/4 inch wood screws, 2 each
-
Fiberglas-reinforced strapping tape
-
2 Machine screws, 6/32 by 1-1/2 inch
-
Nail or Icepick
-
Knife with disposable blades
-
Hammer
-
#16 brass tacks
-
Set of banjo strings
-
5-string banjo bridge
Step 1
 |
| Photo 3 by Lorna Wells |
Select a cookie tin at least 10 inches in diameter. Cut the neck wood into two pieces, one 24 inches long and one the width of the tin plus three inches. One end of the smaller piece will fit inside the tin.
Step 2
Lay the edge of the cookie tin on the end of the shorter neck piece and mark the curve of the tin on the heel of the short neck piece. Cut the curve in the neck piece so it will rest securely against the inside of the tin at thje far end from the neck.
Step 3
Cut a rectangle the size and shape of the end of the small neck piece in one side of the cookie-tin. Slide the small neck piece through resting the hole and push the butt end against the opposite side of the cookie-tin. Drill through the cookie-tin and screw the end of the short neck piece in place. The other end should extend through the hole and 3 inches beyond the cookie-tin. Hot glue around the opening where the neck passes through the tin. Set the tin aside.
Step 4
 |
| Photo 1 by Mike Gregory |
Sand the last 5 inches of the 24 inch neck piece flat on the top and bottom for the peg head. Glue two 1-inch wide strips of firring five inches long to the sides of the peg head. Wrap with rubber bands till set. Trim the edges of the peg head and sand them round. Drill four 3/8 inch holes for the eye bolts you will use for tuners. Make 2 holes at the top and two at the bottom of the peg head, far enough apart that your fingers can turn the bolts without bumping into other eyebolts.
Step 5
Sand the “ears“** and back of the neck smooth. Round the back with sandpaper except for the bottom 3 inches of the long neck piece.
 |
| Photo 2 by Mike Gregory |
Step 6
Mark a line straight across the neck five inches below the top of the peg head. Use a square to make the line perfectly straight.* Cut a shallow groove in the neck with the coping saw on the line you marked. Measure and mark lines at the following distances from the first groove. Distances are in millimeters. Cut the second groove at 29.9 millimeters, 58.2, 85, 110.02, 134.00, 156, 177.6. 197.7, 216.5, 234.4, 251.2. 267.1, 282.1, 296.2, 309.5, 322.2, 334.1, and at 345.3 millimeters
 |
| Photo 4 by Mike Gregory |
Step 7
Glue a 5 inch long 1 by 1strip to the left side of the neck between the 8th and 11th strip. Wrap with rubber bands and allow to set. Drill a 3/8 inch hole in the side an inch below the top for the 5th string peg. Screw a short slot screw into the top of the strip as a guide for the fifth string.
Step 8
Glue and screw the ends of the long neck and peghead piece to the 3 inch piece of the short neck piece that is sticking out of the cookie-tin. Allow the glue to set and dry.
Step 9
 |
| Octagonal Banjo - Photo by Roger |
Screw two short flathead screws through the bottom (now the face of the banjo head) of the cookie-tin just behind where the neck enters the tin and near the base of the short neck piece. You may need to insert thin wooden spacers to keep from bending the bottom of the cookie-tin. Drive 5 brass tacks into the end of the cookie-tin. Don't drive them all the way in. Leave a quarter inch of the tacks sticking up to loop the ends of the strings around.
Step 10
Glue the nut into the groove at the top of the fretboard below the peghead. You may have to widen or deepen the groove to lower the nut so that the strings will be 3/16 inches high.
 |
| Colorful cookie tin back - Photo by Roger |
Step 11
Wrap the threads of the quarter inch eyebolts with fiberglass tape and screw into the holes you drilled in the peghead and side of the neck. Put the lid on the bottom of the cookie-tin and hook the loop end of the strings over the tacks in the correct order and then string them down the neck to the appropriate eyebolts.
Step 12
Twist the strings finger tight. Slip the bridge under the strings on the head and stand it upright. Tighten a string till a clear note sounds. When you play the string open and then fret it on the 12th fret, the two notes should be in tune an octave apart. Move the bridge forward or backward to adjust the tune. When it's right, tighten the strings and tune.
 |
| Chief Designer - Mike Gregory | | | |
 |
| Technical Writer - Tom King |
Resources:
- CB Gitty Crafter Supply
- Desert Rose Banjo: Intonation Problems
- Lumber Jocks: Cookie Tin Banjo
- PlanetGaa: GAA's Cookie Tin Banjo
- IMF: Building a Cookie-tin (Backpacking) Banjo
Notes:
Photo 1 - Mike Gregory’s ears being glued on
The ears go on square, and get cut to shape after. Since the client is paying extras, I used a maple slat from a discarded futon, instead of the usual plain firring strip.
Photo 2 - Mike’s Ladder stencil
“Since I mass produce
cookie-tin banjos, I made a stencil out of scrap oak, and some aluminum
bars and some brass bars. A 1x2 firring strip slips in, and a couple
eyebolts with teenuts hold it steady, while the inked points of the
casing wheel mark the frets.”
Photo 3 - Job well done
Completed cookie tin banjo by
Lorna Wells, Tuscon Arizona
Photo 4 - Mike’s comment
Asked the client if he wanted a Danish Butter Cookie tin, for best sound, or an artsy picture of some classy broad. Turns out he's a broad-minded lover of the arts.
Photo 5 & 6 - Unusual Cookie Tin Shape
Roger , Much Wenlock, England