It's coming on springtime and time to get out on the water in the old canoe; perhaps to do a little fishing. A canoe, by it's very nature is an unstable platform for fishing. In fact, any activity that involves a lot of moving around heavy equipment, standing or climbing into and out of the boat in deep water. Canoes are not good platforms for scuba diving and they definitely are not the best watercraft to stand up in and wrestle with an active trout, pike or other large fish, unless, of course you like being pitched headlong into cold water while weighted down with fishing gear. My whole life, I would hear news reports almost every other weekend of the fishing season of sheriff's department divers searching the lakes, rivers and bayous for some fisherman's water-logged corpse after he'd fallen overboard from some unstable boat.
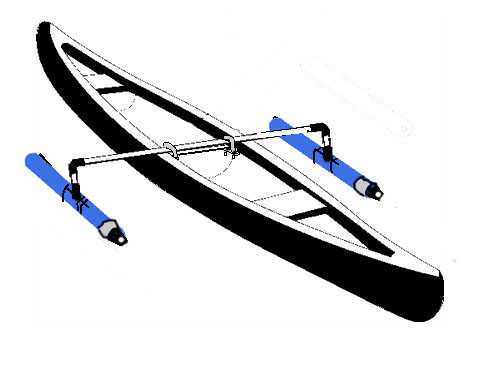
If all you have is a canoe, however, there's good news. An easy solution to the instability of a cone was invented centuries ago by the Polynesians. The Pacific Islanders for millennia only had coconut palms and other skinny trees from which to hollow out boats for themselves. Skinny trees do not make for stable watercraft and the sea is a wild and wavy place. So these clever folk created outriggers for their sea borne canoes to increase their stability. There are a lot of commercial outrigger setups that are available for canoes, but they can be relatively expensive, especially if you're only using the canoe for fishing rarely. Here's an effective solution. It's not terribly stylish, but it will keep you from drowning yourself while fishing by making your boat less tipsy.
If all you have is a canoe, however, there's good news. An easy solution to the instability of a cone was invented centuries ago by the Polynesians. The Pacific Islanders for millennia only had coconut palms and other skinny trees from which to hollow out boats for themselves. Skinny trees do not make for stable watercraft and the sea is a wild and wavy place. So these clever folk created outriggers for their sea borne canoes to increase their stability. There are a lot of commercial outrigger setups that are available for canoes, but they can be relatively expensive, especially if you're only using the canoe for fishing rarely. Here's an effective solution. It's not terribly stylish, but it will keep you from drowning yourself while fishing by making your boat less tipsy.
Here's what you need to make this.
Tools:
- Zip ties
- PVC cleaner
- PVC cement
- Knife
- Hacksaw
Materials:
- Styrofoam swimming “noodle” with hole in the center
- 12 feet of 1 inch heavy duty (stiff) PVC pipe
- Two 1 inch PVC “T’s”
- Two 90 degree 1 inch PVC elbows
- Two large u-bolts. They should be wide enough to fit over the center thwart of your canoe and long enough to clamp the thwart and 1 inch pipe together
- Measure and cut the pipe - Measure the width of your canoe at the center thwart (the one you will
clamp this rig to. Add enough length to it so the pipe extends 12 to 18 inches beyond the gunwales of your canoe. If, for instance, your canoe is 22 inches wide, add ag least 24 to 36 inches to the width of the canoe and cut the pipe that long. The reason for giving you a range is so you can adjust it to your own preferences. A shorter outrigger pole is less stable, but more stiff, so it flexes less when you are standing in the boat. The longer length will make your outrigger more tip resistant, but less strong and more prone to flexing. If you want a longer outrigger that is more stiff, simply buy a heavier gauge pipe. You cold even use a light metal pipe of the sort used in electrical conduit, but it will significantly increase your cost and may not help that much.
Crossmember with elbows cemented in place

- Once you've cut the pipe, cement the two 90-degree elbows to ends of pipe so that both openings.
When attached both elbows will need to turn downward. The cementing part is easy. Clean the ends of the pipe and the insides of the elbows with PVC cleaner. Spread the pipe glue on the outside of the pipe and inside of the elbow and push them together. The cement will set pretty quickly.
Crossmember with down pipes and T's in place

- Cut two 4" to 6" pieces of 1 inch pipe and glue them to the open ends of the elbows so you have both pointing the same direction (downward when the rig is in place).
- Now glue the two PVC “T’s” to the end of the down pipes so that their openings are perpendicular to the cross pipe. The openings should be parallel to the sides of the canoe.
- With a knife, cut two 24 to 27 inch long pieces from the Styrofoam swim noodle.
- Slit the noodles lengthwise so the cut goes halfway through to the hollow center of each noodle.
- Now you'll need to cut four pieces of pipe so that they are 12 to 14 inches long. Measure and cut
the pipes so that with one stuck into each of the openings of the PVC T's will equal the same length as the piece of swim noodle that will be your outrigger's flotation.
Noodles wrapped over perpendicular pipes

- Cement one pipe into each end of the two T's. Let the pieces set for ten minutes before moving the framework around.
- Now pry apart the lengthwise slits in the Styrofoam noodles wrap them around the pipe assemblies attached to the "T's". The pipe should settle down into the hole at the center of the noodle. You'll have to push the “T” down into the slit and there will be a gap there. You can trim around it with your knife for a close fit or just pull it tight with the zip ties. Your choice. When you are done you'll have two stiffened foam floats running parallel to the sides of your boat once the cross-member is clamped into place
- Wrap zip ties around the noodles spaced evenly along either side of
the “T’ joint to hold them in
place.
Zip tie close to T's then space along length of noodles

- An easy way to streamline your outriggers and cut drag is to cut the bottom out of 12 ounce water or soda bottles. With a screwing motion you can force them over the ends of the foam noodles. Once they are in place, wrap a few turns of duct tape around them to hold them in place. If you want something more permanent, you could drill through the bottles, the foam and the pipes underneath and run a small bolt through it all and add flat washers to both ends and lock washers to the nut side to hold it in place. I wouldn't go that far, though. I always keep some duct tape with the boat for repairs. If the tape gets soggy, just replace it.
- With your U-bolts clamp the cross member to the center thwart. I'd pad the thwart between the
bolt and the thwart to prevent scratching but that's up to you. An easier way is to zip tie the outrigger/stabilizer cross member to the center thwart with heavy duty zip ties and you’re ready to go.
Bolt crossmember in place, Cover ends of noodles
with soda bottles for streamlining effect

You may have to fiddle with duct tape or something to keep the cross member for rotating or sliding right or left. You could custom design some sort of over and under shaped wood mounting saddle for the cross member with bolts and wing nuts to hold it in place.
References for commercial resources:
Outrigger Stabilizers for Canoes and Boats: Castlecraft
Canoe Stabilizer: Sailboats to Go
Outriggers for Canoes: Easy Rider Kayaks
Dan’s Kayak
Canoe outriggers to stabilize your canoe: RM Specialites
http://www.canoeoutriggers.com/© 2016 by Tom King

