You’ve got damage to that beautiful cedar strip canoe of yours. Now what do you do? The repair job is relatively straightforward if you have a modicum of woodworking skills, but you may want to go a little farther. You may want to consider fiberglassing the whole thing when you are done to add years to the life of your boat. A light fiberglass cloth with an epoxy-based resin adds a beautiful thick clear coat that not only protects the hull, but also brings out the wood grain in stunning fashion.
This How-to is in two parts then. First – replacing the cedar strips. Second – fiberglassing the hull. Of course, part two is optional, but it’s worth considering if you’ll be using the canoe a lot or if it’s stored outdoors.
Replacing the Cedar Strips

Step 1
Decide how badly the hull is damaged. If it’s just a dent, you can probably sand it down or fill in the spot with a thin cedar veneer. For this tutorial, we’ll assume a hole that damages two adjacent strips (it’s never one is it?). You’ll have to remove them.
Step 2
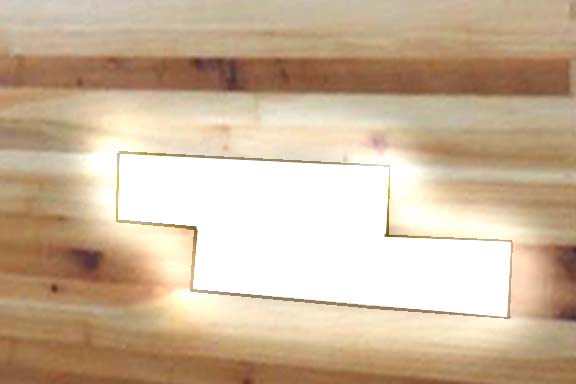
When you remove the damaged strips, you’ll want to stagger the cuts as shown in the picture. This disguises the repair and increases hull strength by avoiding the placement of end seams next to each other.

Step 3
Once you’ve marked where you want to remove the strips, you’ll need to cut the end seams first. I use a sharp knife and score crosswise across the old strip where I want to cut it free. Then rescore repeatedly till you are through the wood strip. Because there are ribs and other layers of hull underneath, you can’t just take a saber saw to it as you would with one of the cedar/epoxy canoes. Now score a couple of passes along the sides between the piece to be removed and the neighboring strips. To remove the strips, score down the center and split each strip. You can then carefully pry them up in the middle and pull the edges loose for the neighboring strip. The strips should come apart at the side seams and lift right out. Do everything slowly and carefully so as not to damage neighboring wood.
Step 4
Very lightly sand the edges to remove splinters. Too much sanding can curve the straight edges along the
 sides and end, so go easy. Lay a piece of butcher paper over the hole and use a pencil to shade the outline of the place to be repaired. This will help you when cutting the replacement strips. Be sure to measure the thickness of the strips on your canoe so you get replacements of the correct thickness. You don’t want a dip or bump where the new repair is.
Step 5
When you cut out cedar strips for the repair, use the pattern you made to reproduce the exact shape of the hole. Work slowly because you need the strips to fit
 exactly into the opening. Use epoxy glue or other high strength water repellant glue. Apply it to the edges, ends and back of the strip as you fit it into place. Don’t use glue where the second replacement piece will touch the first. Keep this area clean and dry till you are ready to install the second piece. Press the strip into place and wipe any excess glue that squeezes out around the seams. Apply pressure while the glue sets to hold it tight against the hull. Depending on the spot you may be able to set something heavy on it or bungee something block like over the top. Use something that won’t adhere to the glue in case some more squeezes out of the seams. Let the first strip dry and cure overnight.
Step 6
Take pictures to show you doing this all by yourself. Video is nice if you can get it. You want evidence so that when you're beating your chest over the beautiful work you did and someone calls you on it, you can whip out a photo.
Step 7
Apply the second strip the same way you did the first and again apply pressure while it is setting. Again,
 allow to dry and cure overnight.
Step 8
Get some wood filler that matches the color of your cedar strips. Use 1/32 milled glass putty filler if you can find it. Work the filler into the seams where there are any gaps or holes. Let it dry, then sand the entire repaired area and adjacent strips. Gradually lighten your sanding pressure as you move onto the neighboring strips.
Step 9
Now you need to make a decision. Are you going to just varnish the repaired spot or fiberglass the hull to
 prevent any further damage? If not glassing the hull, then once you’ve fine sanded the repaired area, apply several thin coats of marine spar varnish to the area. You may find that you need to recoat the entire hull in order to blend in the patch.
Glassing the Hull
Step 1
For this you’ll need the following:
Epoxy fiberglass resin and hardener
Disposable small bucket or can and stirring stick for the resin
Flat edged spreader (plastic or metal wide putty knife will work).
4-6 oz. E-glass Fiberglass fabric - Plain Weave Thickness: 0.0093"
Fine grades of sandpaper and a few course sheets for the edges.
Steel wool fine to extra fine
Acetone
Latex or rubber gloves
Respirator, especially if working indoors.
Step 2
Use a 4 to 6 ounce E-glass fiberglass fabric that is lightweight and works well with the epoxy resin. You’ll need a piece large enough to completely cover the boat. It should overlap by a couple of inches, as the cloth will shrink up when curing. Use heavy-duty scissors to trim the fabric along the gunwales all the way to the ends of the canoe. You may need to cut notches out of the fabric to accommodate curves in the hull, bow and stern. If you do, tease a few threads from the fabric along where the edges of the cuts will meet so they blend together better when you apply the resin and you don’t get that overlap “bump” when you are done. I use duct tape to tape the fabric in place while trimming and remove it as I apply the resin.
Step 3
Put on your gloves and respirator. Mix up a small batch of epoxy resin. Starting at one end, pre-wet a section of the hull with the epoxy resin. Pull up the fiberglass cloth. Pre-wet the area by brushing it with the epoxy coat. Now lay the fiberglass back over the wet resin and push it into place with your fingers. Brush more resin on top to saturate the fiberglass fabric till the white threads and any bubbles disappear. E-cloth is harder to saturate than regular fiberglass cloth, so be patient.
Step 4
Use the spreader to smooth the surface of the section, to press the cloth firmly against the hull, to make sure the resin fills all the spaces in the fabric and to remove any remaining air bubbles. A low viscosity resin helps the E-cloth soak up the resin better. You can also warm the resin before lay-up. This helps make the repair completely transparent.
Step 5
Proceed section by section from one end to the other. When you’re done, go back to the parts that have already set and tap the surface with a quarter. If it sounds hollow, the fiberglass has delaminated from the hull and will need to be removed and replace. If you’re careful, however, this should not be a problem.
Step 6
Allow the fiberglass resin to cure overnight. Then crank up the sander and smooth the edges where the fiberglass may have overlapped the edges or created bumps or burrs. Sand the entire hull thoroughly first with light sandpaper and then two or three more times with progressively lighter sandpaper. Finish by rubbing the whole thing with fine grade steel wool.
Step 7
Brush or spray on an epoxy based clear coat. A sprayer works better, but either way use thin coats and apply several allowing them to dry and cure between coats. Lightly scrub each coat with fine steel wool and wipe clean before spraying the next coat.
Step 8
Get out the buffer and polish the hull to a high shine. Your beautiful shiny canoe will slip so quietly through the water you won’t believe it. It will be a little heavier to carry, but let’s face it. You aren’t likely to be taking this beauty into any whitewater rock gardens are you? You’ll just want to stand there in the garage and look at it, but don’t be afraid. Take it out on the water and make everyone jealous. Cedar canoes are the Rolls Royces of the canoe world. Show your baby off!
(c) 2010 by Tom King: Rights Reserved. Feel free, however, to link to this website.
Does it matter where the ends of the replaced strips are relative to the underlying ribs when I repair my cedar strip rowboat?
ReplyDeleteEric: It rather depends on the underlying framework of your rowboat. How far apart the ribs are primarily. In a cedar strip canoe, the ribs are fairly close together. I like for the replacement strips to span two ribs for support from below. It's not essential that the strip end directly on top of a rib so long as the unsupported length beyond the rib isn't more than a few inches and doesn't leave the old strip over extended too far. The fiberglass filler, epoxy or whatever adhesive filler you use should secure the patch well enough for normal use. If you fiberglass the hull or the patch area afterward, it should beef up the patch even more so. If you are worried, you can always fiberglass over the area from inside the boat. - Tom
ReplyDeleteHave a stripper with 4 small holes that was mounted inside. Can I make this water tight w/o replacing strips? Thanks, Dan
ReplyDeleteIf the holes on the outside aren't bad and you aren't worried about looks, a little wood filler and whatever finish the boat is coated in should make it water tight. You can always cover the holes on the inside with a fiberglass patch. If you want to make the holes go away, you'll have to replace the strips, but if you're not fanatical about the looks of the thing, you shouldn't have to go so far as to replace the strips. Repaired carefully with filler, sanding a little matching wood stain nd a touchup of the clearcoat and you may find the "distressed" look of the repaired holes only serve to give the boat character.
ReplyDeleteTook me time to read all the comments, but I really enjoyed the article. It proved to be Very helpful to me and I am sure to all the commenters here! It’s always nice when you can not only be informed, but also entertained! kitchenfaucetguides.net
ReplyDeleteSimply wish to say your article is as astonishing. The clarity in your post is simply great, and I could assume you are an expert on this subject. Same as your blog i found another one Sohman Epoxy .Actually I was looking for the same information on internet for
ReplyDeleteBCA and came across your blog. I am impressed by the information that you have on this blog. Thanks a million and please keep up the gratifying work.
I built a cedar strip canoe in 1984: there is a section of fiberglass that has bubbled up on the bottom and just started up around the curve on one side. Is there a "glue" that I can inject into that bubble and make that adhere to the canoe. I'm not ready to retire the canoe just yet. Thanks for any information. Dennis
ReplyDeleteYou might inject more fiberglass resin and hardener(follow the directions on the container). Fill up the bubble. Or you can sand it off and layer on another fiberglass cloth and resin/epoxy coat to make it lay flat. Fiberglass is pretty forgiving that way.
ReplyDelete